Levva33566@legacy41553733 (talk | contribs) (Link Guild Achievements) |
m (Adding {{ood}} for quests and possibly more.) |
||
| Line 1: | Line 1: | ||
| − | {{ |
+ | {{cleanup}}{{ood}} |
| + | {{infobox instance |
||
| − | '''Guild achievements''' are a combination of general, pvp and raid achievements earned through efforts of the guild as a whole. You will typically need 80% of a dungeon (4/5) or raid (8/10, 20/25) to be from the same guild in order to gain credit for events, with the exception of 100% for arena teams (2/2, 3/3, 5/5) and 40-man raids (10/40).<ref>[http://forums.worldofwarcraft.com/thread.html?sid=2000&topicId=26560501163&pageNo=1#5 WoW Cataclysm Beta (English) Forums: Guild achievements for classic dungeons/raids, post 5 (blue post by Mumper), 09/09/2010]</ref> |
||
| + | |name=Wailing Caverns |
||
| + | |aka=WC |
||
| + | |ss=Wailing Caverns loading screen.jpg |
||
| + | |caption=Wailing Caverns loading graphic |
||
| + | |loc=[[Lushwater Oasis]], [[The Barrens]] |
||
| + | |race={{Race|Night Elf }}<br />{{Race|Tauren }} |
||
| + | |boss=[[Mutanus the Devourer]] |
||
| + | |type= |
||
| + | |level=15-25 |
||
| + | |minlevel=10 |
||
| + | |players=5 (10) |
||
| + | |key= |
||
| + | |bosses={{Wailing Caverns}} |
||
| + | }} |
||
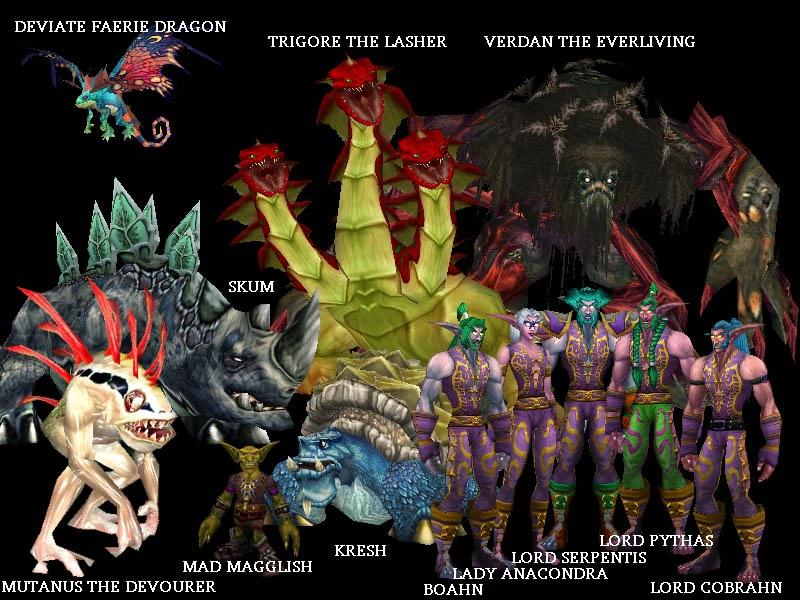
| + | [[File:WCbosses.jpg|thumb|Wailing Caverns bosses]] |
||
| + | The '''Wailing Caverns''' in the [[Barrens]] is one of the first [[instance|instanced]] dungeons (outside of a major city) that lower-level [[Horde]] players encounter. It is also worthwhile for [[Alliance]] characters to run, though possibly inconvenient, as it is located in Horde territory. The new [[Dungeon Finder]] system helps address this since players can teleport to the instance, but first require to "find" the instance area in [[The Barrens]] before the instance unlocks and becomes available to join. While the level of relative difficulty is fairly low, this instance is quite large and a minimum of 180 minutes (three hours) should be set aside by players wishing to complete it. |
||
| + | This instance is extremely conducive to solo play for characters of most classes after around level 30 to 35. At these levels one will be all but immune to some of the more troublesome effects, such as the [[Druids of the Fang]]'s sleep spell. Those under level 40 should exercise caution when [[pull]]ing [[mobs]]. |
||
| − | {| class="darktable sortable zebra plainlinks" align=center |
||
| − | |+General |
||
| − | |- |
||
| − | ! Title !! class=unsortable | Description !! Reward |
||
| − | |- |
||
| − | | {{Achievement|Guild Level 5}} || Reach guild level 5. || Guild Vault Voucher (7th Tab) |
||
| − | |- |
||
| − | | {{Achievement|Guild Level 10}} || Reach guild level 10. || Heirloom Cloaks |
||
| − | |- |
||
| − | | {{Achievement|Guild Level 15}} || Reach guild level 15. || {{loot|rare|Wrap of Unity}} |
||
| − | |- |
||
| − | | {{Achievement|Guild Level 20}} || Reach guild level 20. || Heirloom Helms |
||
| − | |- |
||
| − | | {{Achievement|Guild Level 25 Alliance}} || Reach guild level 25. || {{loot|epic|Reins of the Golden King}} |
||
| − | |- |
||
| − | | {{Achievement|Guild Level 25 Horde}} || Reach guild level 25. || {{loot|epic|Reins of the Kor'kron Annihilator}} |
||
| − | |- |
||
| − | | Profit Sharing || Loot 50,000 gold from creatures. |
||
| − | |- |
||
| − | | Saving For A Rainy Day || Loot 100,000 gold from creatures. || Guild Herald |
||
| − | |- |
||
| − | | Time To Open A Savings Account || Loot 200,000 gold from creatures. |
||
| − | |- |
||
| − | | Extended Storage || Purchase the 7th guild bank tab. |
||
| − | |- |
||
| − | | {{Achievement|Critter Kill Squad}} || Kill 10,000 critters. || {{loot|rare|Armadillo Pup}} |
||
| − | |- |
||
| − | | A Class Act || Reach level 85 on each of the classes listed below. || {{loot|uncommon|Shroud of Cooperation}} |
||
| − | |- |
||
| − | | Stay Classy (Horde) || Complete the classy achievements listed below. || Guild Vault Voucher (8th Tab) |
||
| − | |- |
||
| − | | Stay Classy (Alliance) || Complete the classy achievements listed below. || Guild Vault Voucher (8th Tab) |
||
| − | |- |
||
| − | | Classy Orcs || Reach level 85 of each of the Orc classes listed below. |
||
| − | |- |
||
| − | | Classy Tauren || Reach level 85 of each of the Tauren classes listed below. |
||
| − | |- |
||
| − | | Classy Trolls || Reach level 85 of each of the Troll classes listed below. |
||
| − | |- |
||
| − | | Classy Blood Elves|| Reach level 85 of each of the Blood Elf classes listed below. |
||
| − | |- |
||
| − | | Classy Undead || Reach level 85 of each of the Undead classes listed below. |
||
| − | |- |
||
| − | | Classy Goblins || Reach level 85 of each of the Goblin classes listed below. |
||
| − | |- |
||
| − | | Classy Humans || Reach level 85 of each of the Human classes listed below. |
||
| − | |- |
||
| − | | Classy Night Elves|| Reach level 85 of each of the Night Elf classes listed below. |
||
| − | |- |
||
| − | | Classy Gnomes || Reach level 85 of each of the Gnome classes listed below. |
||
| − | |- |
||
| − | | Classy Dwarves || Reach level 85 of each of the Dwarven classes listed below. |
||
| − | |- |
||
| − | | Classy Draenei || Reach level 85 of each of the Draenei classes listed below. |
||
| − | |- |
||
| − | | Classy Worgen || Reach level 85 of each of the Worgen classes listed below. |
||
| − | |- |
||
| − | | Classy Orcs || Reach level 85 of each of the Orc classes listed below. |
||
| − | |- |
||
| − | | Everyone Needs A Logo || Create and purchase a guild crest. |
||
| − | |- |
||
| − | | It All Really Adds Up || Spend 100,000 gold on guildmember repairs. |
||
| − | |- |
||
| − | | That's a Lot of Travel Time || Complete 25,000 quests. |
||
| − | |- |
||
| − | | A Daily Routine || Complete 25,000 daily quests. || Battle Standard of Coordination |
||
| − | |- |
||
| − | | You've Been Iced || Figure it out. |
||
| − | |} |
||
| + | One primary reason to venture into the Wailing Caverns is for [[BoP]] drops from the numerous bosses in the instance. Some of the quest rewards are also highly desirable. Both of the rewards from the {{questlong|Horde|22|Leaders of the Fang}} quest are blue weapons, which are likely better than anything one will obtain until [[Shadowfang Keep]]. The quest item, {{loot|common|Glowing Shard}}, that drops from the last boss, {{NPC||Mutanus the Devourer}}, leads to a reward of excellent caster shoulders ({{loot|uncommon|Talbar Mantle}}). A large portion of random drops are good [[BoE]] gear for levels 10-19. Harvesters will find the yields in The Wailing Caverns are better than the surrounding [[Barrens]], if they have the skill to harvest the better materials. Even the [[poor]] [[quality]] drops are better than ordinary; a stack of typical trash drops is worth around five to ten silver. |
||
| − | {| class="darktable sortable zebra plainlinks" align=center |
||
| − | |+Legendaries |
||
| − | |- |
||
| − | ! Title !! class=unsortable | Description !! Reward |
||
| − | |- |
||
| − | | We Are Awesome || Obtain three of the legendary weapons listed below. |
||
| − | |- |
||
| − | | We Are Hardcore || Obtain all of the legendary weapons listed below. |
||
| − | |- |
||
| − | | Sulfuras, Hand of Ragnaros - Guild Edition || Wielder of Sulfuras, Hand of Ragnaros. |
||
| − | |- |
||
| − | | Thunderfury, Blessed Blade of the Windseeker - Guild Edition || Wielder of Thunderfury, Blessed Blade of the Windseeker. |
||
| − | |- |
||
| − | | Warglaives of Azzinoth - Guild Edition || Wielder of a set of Warglaives of Azzinoth. |
||
| − | |- |
||
| − | | Thori'dal, the Stars' Fury - Guild Editione || Wielder of Thori'dal, the Stars' Fury. |
||
| − | |- |
||
| − | | Val'anyr, Hammer of Ancient Kings - Guild Edition || Wielder of Val'anyr, Hammer of Ancient Kings. |
||
| − | |- |
||
| − | | Shadowmourne - Guild Edition || Wielder of Shadowmourne. |
||
| − | |} |
||
| + | ==History== |
||
| − | {| class="darktable sortable zebra plainlinks" align=center |
||
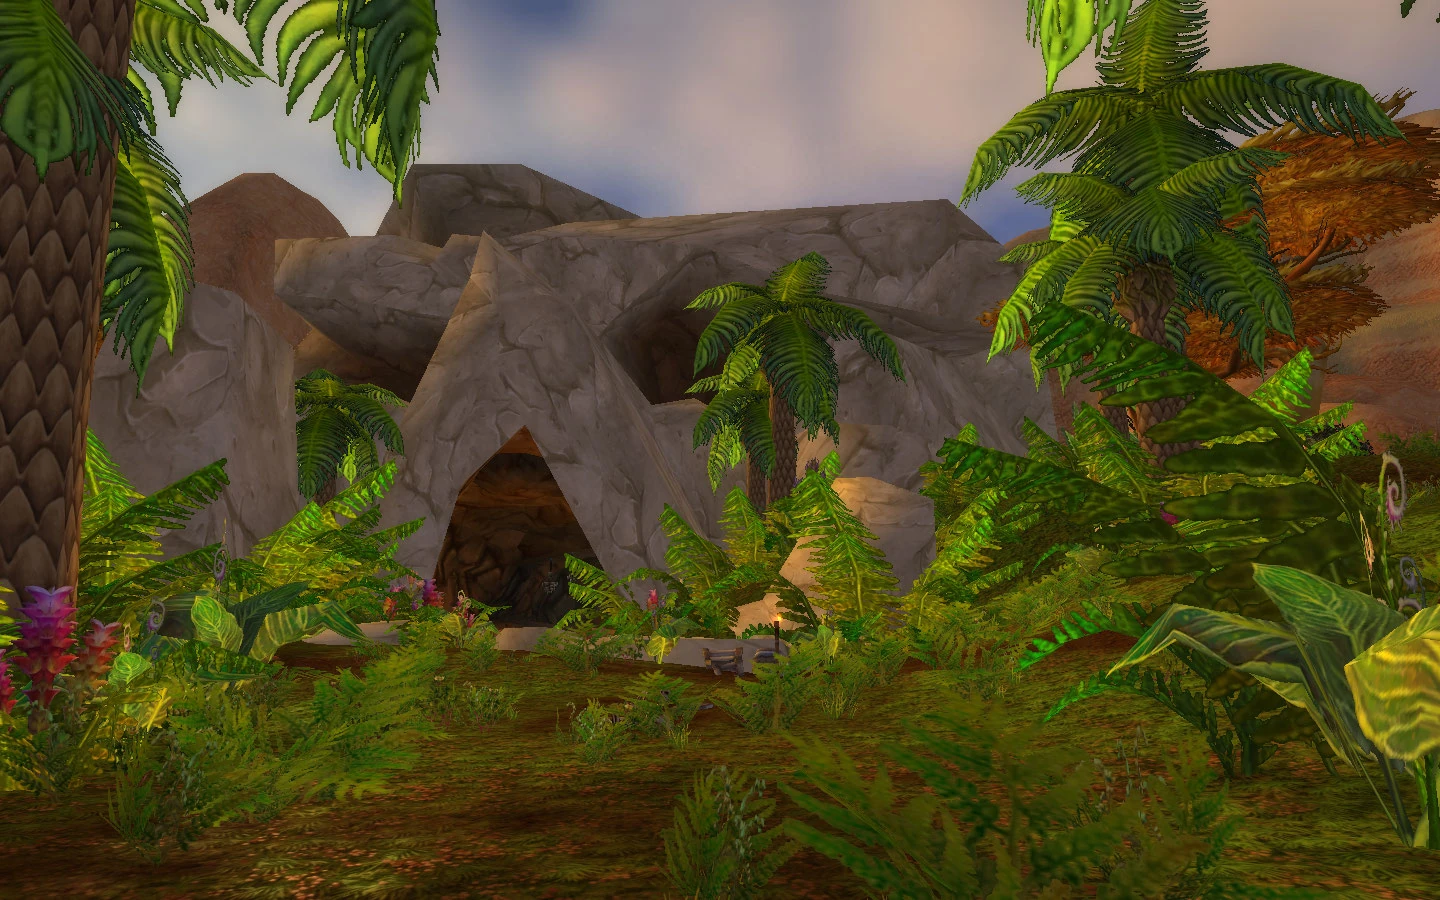
| + | [[File:WC entrance.jpg|thumb|Wailing Caverns entrance]] |
||
| − | |+Classic raids |
||
| + | {{wow-dungeons}} |
||
| − | |- |
||
| − | ! Title !! class=unsortable | Description !! Reward |
||
| − | |- |
||
| − | | Guild Classic Raider || Complete the classic raid achievements listed below while in a guild group. |
||
| − | |- |
||
| − | | Molten Core Guild Run || Defeat Ragnaros. |
||
| − | |- |
||
| − | | Blackwing Lair Guild Run || Defeat Nefarian. |
||
| − | |- |
||
| − | | Temple of Ahn'Qiraj Guild Run || Defeat C'Thun. |
||
| − | |- |
||
| − | | Ruins of Ahn'Qiraj Guild Run || Defeat Ossirian the Unscarred. |
||
| − | |} |
||
| + | :''Recently, a [[night elf]] [[druid]] named {{NPC||Naralex}} discovered a network of underground caverns within the heart of the [[Barrens]]. Dubbed the 'Wailing Caverns', these natural caves were filled with steam fissures which produced long, mournful wails as they vented. Naralex believed he could use the caverns' underground springs to restore lushness and fertility to the Barrens - but to do so would require siphoning the energies of the fabled [[Emerald Dream]]. Once connected to the Dream however, the druid's vision somehow became a nightmare. Soon the Wailing Caverns began to change - the waters turned foul and the once-docile creatures inside metamorphosed into vicious, deadly predators. It is said that Naralex himself still resides somewhere inside the heart of the labyrinth, trapped beyond the edges of the Emerald Dream. Even his former acolytes have been corrupted by their master's waking nightmare - transformed into the wicked [[Druid of the Fang|Druids of the Fang]].'' |
||
| − | {| class="darktable sortable zebra plainlinks" align=center |
||
| − | |+Burning Crusade raids |
||
| − | |- |
||
| − | ! Title !! class=unsortable | Description !! Reward |
||
| − | |- |
||
| − | | Guild Outland Raider || Complete the Burning Crusade raid achievements listed below while in a guild group. |
||
| − | |- |
||
| − | | Karazhan Guild Run || Defeat Prince Malchezaar in Karazhan. |
||
| − | |- |
||
| − | | Zul'Aman Guild Run || Defeat Zul'jin in Zul'Aman. |
||
| − | |- |
||
| − | | Magtheridon's Lair Guild Run || Defeat Magtheridon in Magtheridon's Lair. |
||
| − | |- |
||
| − | | Serpentshrine Cavern Guild Run || Defeat Lady Vashj in Serpentshrine Cavern. |
||
| − | |- |
||
| − | | Tempest Keep Guild Run || Defeat Kael'thas Sunstrider in Tempest Keep. |
||
| − | |- |
||
| − | | The Battle for Mount Hyjal Guild Run || Defeat Archimonde in The Battle for Mount Hyjal. |
||
| − | |- |
||
| − | | The Battle for Mount Hyjal Guild Run || Defeat Illidan Stormrage in The Black Temple. |
||
| − | |- |
||
| − | | Sunwell Plateau Guild Run || Defeat Kil'jaeden in Sunwell Plateau. |
||
| − | |} |
||
| + | == Geography == |
||
| − | {| class="darktable sortable zebra plainlinks" align=center |
||
| + | === Maps === |
||
| − | |+Wrath of the Lich King raids |
||
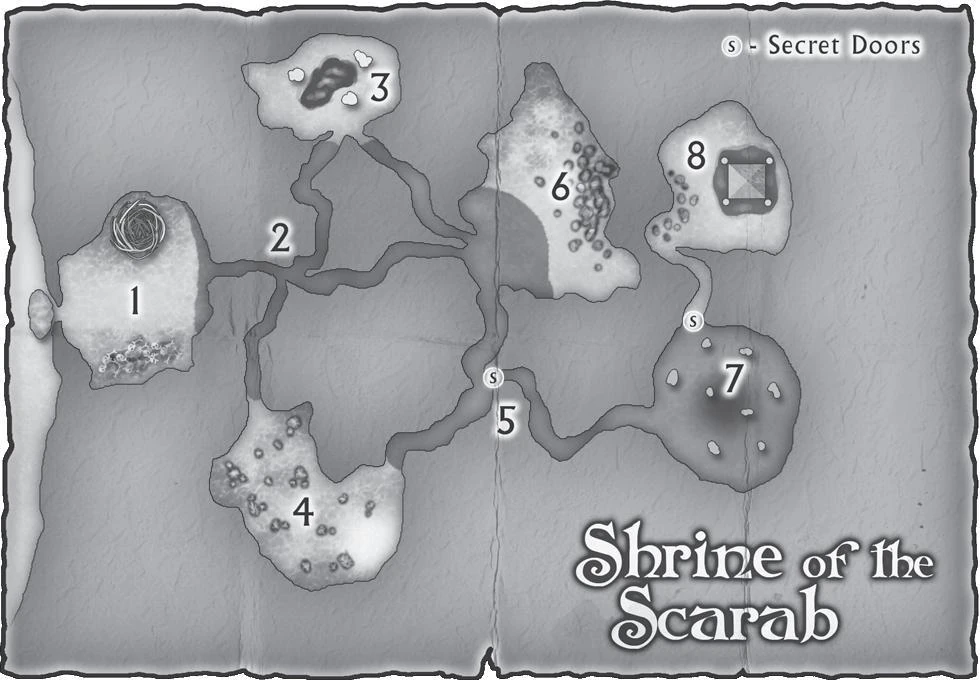
| + | [[File:WCScarabshrine.JPG|thumb|Shrine of the Scarab (region in Wailing Caverns)]] |
||
| − | |- |
||
| + | [[File:WorldMap-WailingCaverns1.jpg|thumb|left|300px]] |
||
| − | ! Title !! class=unsortable | Description !! Reward |
||
| + | {{clr}} |
||
| − | |- |
||
| − | | Glory of the Lich King Raider || Complete the Northrend raid achievements listed below while in a guild group. |
||
| − | |- |
||
| − | | The Twilight Zone - Guild Edition || With all three Twilight Drakes still alive, engage and defeat Sartharion the Onyx Guardian while in a guild group. |
||
| − | |- |
||
| − | | Alone in the Darkness - Guild Edition || Defeat Yogg-Saron without the assistance of any Keepers while in a guild group. |
||
| − | |- |
||
| − | | Just Can't Get Enough - Guild Edition || Defeat Kel'Thuzad in Naxxramas while killing at least 18 abominations in his chamber while in a group group. |
||
| − | |- |
||
| − | | You Don't Have an Eternity - Guild Edition || Defeat Malygos in 6 minutes or less while in a guild group. |
||
| − | |- |
||
| − | | He Feeds On Your Tears - Guild Edition || Defeat Algalon the Observer while in a guild group without any raid member dying to Algalon at any point during that raid lockout period. |
||
| − | |- |
||
| − | | Call of the Crusade - Guild Edition || Defeat every boss in the Trial of the Crusader while in a guild group. |
||
| − | |- |
||
| − | | The Twilight Destroyer - Guild Edition || Defeat Halion in The Ruby Sanctum while in a guild group. |
||
| − | |- |
||
| − | | The Frozen Throne - Guild Edition || Defeat the Lich King in Icecrown Citadel while in a guild group. |
||
| − | |} |
||
| + | ===Subregions=== |
||
| − | {| class="darktable sortable zebra plainlinks" align=center |
||
| + | {| class="darktable" |
||
| − | |+Cataclysm raids |
||
|- |
|- |
||
| + | ||[[Cavern of Mists]]{{·}} [[Crag of the Everliving]]{{middot}} [[Dreamer's Rock]]{{middot}} [[Pit of Fangs]]{{middot}} [[Wailing Caverns right eye socket cave|Right eye socket cave]] (outside and above cave entrance){{middot}} [[Screaming Gully]]{{middot}} [[Winding Chasm]] |
||
| − | ! Title !! class=unsortable | Description !! Reward |
||
| − | |- |
||
| − | | Guild Glory of the Cataclysm Raider || Complete the Cataclysm raid achievements listed below while in a guild group. || {{loot|epic|Reins of the Dark Phoenix}} |
||
| − | |- |
||
| − | | Blackwing Descent Guild Run || Defeat the bosses in Blackwing Descent while in a guild group. |
||
| − | |- |
||
| − | | Throne of the Four Winds Guild Run || Defeat the bosses in Throne of the Four Winds while in a guild group. |
||
| − | |- |
||
| − | | The Bastion of Twilight Guild Run || Defeat the bosses in Throne of the Four Winds while in a guild group. |
||
| − | |- |
||
| − | | Baradin Hold Guild Run || Defeat Argaloth in Baradin Hold while in a guild group. |
||
|} |
|} |
||
| + | ==Walkthrough== |
||
| − | {| class="darktable sortable zebra plainlinks" align=center |
||
| + | ===Preparation=== |
||
| − | |+Classic dungeons |
||
| + | *Several of the quests within Wailing Caverns are within a quest chain, and cannot be acquired until the previous quests are completed. Examine the quest list and get the quests you want to accomplish within The Wailing Caverns. |
||
| − | |- |
||
| − | ! Title !! class=unsortable | Description !! Reward |
||
| − | |- |
||
| − | | Ragefire Chasm Guild Run || Defeat Taragaman the Hungerer. |
||
| − | |- |
||
| − | | Deadmines Guild Run || Defeat "Captain" Cookie. |
||
| − | |- |
||
| − | | Wailing Caverns Guild Run || Defeat Mutanus the Devourer. |
||
| − | |- |
||
| − | | Shadowfang Keep Guild Run || Defeat Lord Godfrey. |
||
| − | |- |
||
| − | | Blackfathom Deeps Guild Run || Defeat Aku'mai. |
||
| − | |- |
||
| − | | Stormwind Stockade Guild Run || Defeat Hogger. |
||
| − | |- |
||
| − | | Razorfen Kraul Guild Run || Defeat Charlga Razorflank. |
||
| − | |- |
||
| − | | Gnomeregan Guild Run || Defeat Mekgineer Thermaplugg. |
||
| − | |- |
||
| − | | Razorfen Downs Guild Run || Defeat Amnennar the Coldbringer. |
||
| − | |- |
||
| − | | Scarlet Monastery Guild Run || Defeat the Scarlet Crusade within the Scarlet Monastery. |
||
| − | |- |
||
| − | | Uldaman Guild Run || Defeat Archaedas. |
||
| − | |- |
||
| − | | Zul'Farrak Guild Run || Defeat Chief Ukorz Sandscalp. |
||
| − | |- |
||
| − | | Maraudon Guild Run || Defeat Princess Theradras. |
||
| − | |- |
||
| − | | Sunken Temple Guild Run || Defeat Shade of Eranikus. |
||
| − | |- |
||
| − | | Blackrock Depths Guild Run || Defeat Emperor Dagran Thaurissan. |
||
| − | |- |
||
| − | | Lower Blackrock Spire Guild Run || Defeat Overlord Wyrmthalak. |
||
| − | |- |
||
| − | | King of Dire Maul Guild Run || Defeat each wing of Dire Maul. |
||
| − | |- |
||
| − | | Scholomance Guild Run || Defeat the leaders of Scholomance. |
||
| − | |- |
||
| − | | Stratholme Guild Run || Defeat the evil masterminds inhabiting Stratholme. |
||
| − | |} |
||
| + | *Have plenty of open bag space when you do Wailing Caverns. There are plenty of good drops, so whatever bag space you have will not be enough. |
||
| − | {| class="darktable sortable zebra plainlinks" align=center |
||
| − | |+Burning Crusade dungeons |
||
| − | |- |
||
| − | ! Title !! class=unsortable | Description !! Reward |
||
| − | |- |
||
| − | | Guild Outland Dungeon Hero || Complete the heroic Burning Crusade dungeon achievements listed below while in a guild group. |
||
| − | |- |
||
| − | | Heroic: Hellfire Ramparts Guild Run || Defeat the leaders of Hellfire Ramparts on Heroic Difficulty. |
||
| − | |- |
||
| − | | Heroic: The Blood Furnace Guild Run || Defeat Keli'dan the Breaker on Heroic Difficulty. |
||
| − | |- |
||
| − | | Heroic: The Slave Pens Guild Run || Defeat Quagmirran on Heroic Difficulty. |
||
| − | |- |
||
| − | | Heroic: Underbog Guild Run || Defeat Nexus-Prince Shaffar on Heroic Difficulty. |
||
| − | |- |
||
| − | | Heroic: Mana-Tombs Guild Run || Defeat Nexus-Prince Shaffar on Heroic Difficulty. |
||
| − | |- |
||
| − | | Heroic: Auchenai Crypts Guild Run || Defeat Exarch Maladaar on Heroic Difficulty. |
||
| − | |- |
||
| − | | Heroic: The Escape From Durnholde Guild Run || Defeat Epoch Hunter on Heroic Difficulty. |
||
| − | |- |
||
| − | | Heroic: Sethekk Halls Guild Run || Defeat Talon King Ikiss on Heroic Difficulty. |
||
| − | |- |
||
| − | | Heroic: Shadow Labyrinth Guild Run || Defeat Murmur on Heroic Difficulty. |
||
| − | |- |
||
| − | | Heroic: Opening of the Dark Portal Guild Run || Defeat Aeonus on Heroic Difficulty. |
||
| − | |- |
||
| − | | Heroic: The Steamvault Guild Run || Defeat Warlord Kalithresh on Heroic Difficulty. |
||
| − | |- |
||
| − | | Heroic: The Shattered Halls Guild Run || Defeat Warchief Kargath Bladefist on Heroic Difficulty. |
||
| − | |- |
||
| − | | Heroic: The Mechanar Guild Guild Run || Defeat Pathaleon the Calculator on Heroic Difficulty. |
||
| − | |- |
||
| − | | Heroic: The Botanica Guild Run || Defeat Warp Splinter on Heroic Difficulty. |
||
| − | |- |
||
| − | | Heroic: The Arcatraz Guild Run || Defeat Harbinger Skyriss on Heroic Difficulty. |
||
| − | |- |
||
| − | | Heroic: Magister's Terrace Guild Run || Defeat Kael'thas Sunstrider on Heroic Difficulty. |
||
| − | |} |
||
| + | *Be sure to climb to the [[Wailing Caverns right eye socket cave|right eye socket of the cave]] and pick up the quests before entering the instance. One person can do this, then share the quest with the rest of the party. |
||
| − | {| class="darktable sortable zebra plainlinks" align=center |
||
| − | |+Wrath of the Lich King dungeons |
||
| − | |- |
||
| − | ! Title !! class=unsortable | Description !! Reward |
||
| − | |- |
||
| − | | Guild Northrend Dungeon Hero || Complete the heroic Northrend dungeon achievements listed below while in a guild group. |
||
| − | |- |
||
| − | | Heroic: Utgarde Keep Guild Run || Defeat the Utgarde Keep bosses on Heroic Difficulty. |
||
| − | |- |
||
| − | | Heroic: The Nexus Guild Run || Defeat The Nexus bosses on Heroic Difficulty. |
||
| − | |- |
||
| − | | Heroic: Azjol-Nerub Guild Run || Defeat the Azjol-Nerub bosses on Heroic Difficulty. |
||
| − | |- |
||
| − | | Heroic: Ahn'kahet: The Old Kingdom Guild Run || Defeat the Ahn'kahet: The Old Kingdom bosses on Heroic Difficulty. |
||
| − | |- |
||
| − | | Heroic: Drak'Tharon Keep Guild Run || Defeat the Drak'Tharon Keep bosses on Heroic Difficulty. |
||
| − | |- |
||
| − | | Heroic: The Violet Hold Guild Run || Defeat Cyanigosa in The Violet Hold on Heroic Difficulty. |
||
| − | |- |
||
| − | | Heroic: Gundrak Guild Run || Defeat the Gundrak bosses on Heroic Difficulty. |
||
| − | |- |
||
| − | | Heroic: Halls of Stone Guild Run || Defeat the boss encounters in the Halls of Stone on Heroic Difficulty. |
||
| − | |- |
||
| − | | Heroic: Halls of Lightning Guild Run || Defeat the Halls of Lightning bosses on Heroic Difficulty. |
||
| − | |- |
||
| − | | Heroic: The Oculus Guild Run || Defeat the Caverns of Time: Stratholme bosses on Heroic Difficulty. |
||
| − | |- |
||
| − | | Heroic: The Culling of Stratholme Guild Run || Defeat The Oculus bosses on Heroic Difficulty. |
||
| − | |- |
||
| − | | Heroic: Utgarde Pinnacle Guild Run || Defeat the Utgarde Pinnacle bosses on Heroic Difficulty. |
||
| − | |- |
||
| − | | Heroic: Trial of the Champion Guild Run || Defeat the bosses in the Trial of the Champion on Heroic Difficulty. |
||
| − | |- |
||
| − | | Heroic: The Forge of Souls Guild Run || Defeat the bosses in The Forge of Souls on Heroic Difficulty. |
||
| − | |- |
||
| − | | Heroic: The Pit of Saron Guild Guild Run || Defeat the bosses in The Pit of Saron on Heroic Difficulty. |
||
| − | |- |
||
| − | | Heroic: The Halls of Reflection Guild Run || Defeat the bosses in The Halls of Reflection on Heroic Difficulty. |
||
| − | |} |
||
| + | ===General progression=== |
||
| − | {| class="darktable sortable zebra plainlinks" align=center |
||
| + | ====The path to instance==== |
||
| − | |+Cataclysm dungeons |
||
| + | * Entrance area outside of the instance |
||
| − | |- |
||
| + | The part of the dungeon before entering the actual instance is filled with 14-17 [[raptor]]s, [[wind serpent]]s, and [[ooze]]s (before patch 2.3, they were elite). This part is easy, just follow the path till you get to the instance. The one pool on the path that you cannot walk around is a minor trap with two [[threshadon]]s. |
||
| − | ! Title !! class=unsortable | Description !! Reward |
||
| − | |- |
||
| − | | Guild Cataclysm Dungeon Hero || Complete the heroic Cataclysm dungeon achievements listed below while in a guild group. || {{loot|rare|Standard of Unity}} |
||
| − | |- |
||
| − | | Heroic: Blackrock Caverns Guild Run || Defeat Ascendant Lord Obsidius on Heroic Difficulty. |
||
| − | |- |
||
| − | | Heroic: Throne of the Tides Guild Run || Defeat Ozumat in Throne of the Tides on Heroic Difficulty. |
||
| − | |- |
||
| − | | Heroic: The Stonecore Guild Run || Defeat High Priestess Azil in the Stonecore on Heroic Difficulty. |
||
| − | |- |
||
| − | | Heroic: The Vortex Pinnacle Guild Run || Defeat Grand Vizier Ertan in the Vortex Pinnacle on Heroic Difficulty. |
||
| − | |- |
||
| − | | Heroic: Grim Batol Guild Run || Defeat Erudax in Grim Batol on Heroic Difficulty. |
||
| − | |- |
||
| − | | Heroic: Halls of Origination Guild Run || Defeat Rajh in Halls of Origination on Heroic Difficulty. |
||
| − | |- |
||
| − | | Heroic: Lost City of the Tol'vir Guild Run || Defeat Siamat, Lord of the South Wind in the Lost City of the Tol'vir on Heroic Difficulty. |
||
| − | |- |
||
| − | | Heroic: Shadowfang Keep Guild Run || Defeat Lord Godfrey in Shadowfang Keep on Heroic Difficulty. |
||
| − | |- |
||
| − | | Heroic: Deadmines Guild Run || Defeat "Captain" Cookie in Deadmines on Heroic Difficulty. |
||
| − | |- |
||
| − | | Heroic: Shadowfang Keep Guild Run || Defeat Lord Godfrey in Shadowfang Keep on Heroic Difficulty. |
||
| − | |- |
||
| − | | Heroic: Cho'gall Guild Run || Defeat Cho'gall in the Bastion of Twilight on Heroic difficulty while in a guild group. |
||
| − | |- |
||
| − | | Heroic: Nefarian Guild Run || Defeat Nefarian in Blackwing Descent on Heroic difficulty while in a guild group. |
||
| − | |- |
||
| − | | Heroic: Al'Akir Guild Run || Defeat Al'Akir in the Throne of the Four Winds on Heroic difficulty while in a guild group. |
||
| − | |- |
||
| − | | Heroic: Sinestra Guild Run || Defeat Sinestra in the Bastion of Twilight on Heroic difficulty while in a guild group. |
||
| − | |} |
||
| + | If you are doing {{Quest|Trouble at the Docks}}, the NPC you are looking for, {{NPC||Mad Magglish}}, can be found in three different locations. He can be hard to find as he is invisible (when you get close to him he appears and attacks you). Upon entering the cavern you will come to the first intersection (T shaped) where you can go left toward the instance entrance or straight to a small drop off. The small nook to the right is the first location where Mad Magglish may be found. If you can't find him there, proceed down the left passage toward the instance entrance. You will come upon a second intersection where you can go straight (to the instance entrance), go left or go right path. Both the left and right passages lead to a dead-end. You may find Mad Magglish in either the left or right passage (his camping area or the blind alley). |
||
| − | {| class="darktable sortable zebra plainlinks" align=center |
||
| + | |||
| − | |+Reputation |
||
| + | {{loot|common|Serpentbloom}} for the Horde quest {{quest|Serpentbloom}}, and {{loot|common|Deviate Hide|Deviate Hides}} and {{loot|common|Wailing Essence|Wailing Essences}} for neutral quests {{quest|Deviate Hides}} and {{quest|Smart Drinks}} can be farmed in this entrance area or in the instance. |
||
| − | |- |
||
| − | ! Title !! class=unsortable | Description !! Reward |
||
| − | |- |
||
| − | | Diplomacy || Raise 15 reputations to Exalted. |
||
| − | |- |
||
| − | | Ambassadors || Raise 25 reputations to Exalted. |
||
| − | |- |
||
| − | | United Nations || Raise 55 reputations to Exalted. || {{loot|rare|Dark Phoenix Hatchling}} |
||
| − | |- |
||
| − | | Dungeon Diplomat || Earn exalted with the dungeon reputations listed below. |
||
| − | |- |
||
| − | | Raid Representation || Earn exalted with the raid reputations listed below. |
||
| − | |- |
||
| − | | Classic Battles || Earn exalted reputation with the classic battlegrounds listed below. |
||
| − | |} |
||
| + | This entrance area has the best rate for {{loot|common|Deviate Scale}} and {{loot|common|Perfect Deviate Scale}}. |
||
| − | {| class="darktable sortable zebra plainlinks" align=center |
||
| + | |||
| − | |+PvP |
||
| + | On a [[PvP]] server, this area lacks the protection of being in an instance. |
||
| − | |- |
||
| + | |||
| − | ! Title !! class=unsortable | Description !! Reward |
||
| + | ==== Lady Anacondra ==== |
||
| − | |- |
||
| + | * Entrance area within the instance |
||
| − | | Are You Not Entertained?! || Earn a 2200 rating in the arena with a team composed entirely of guild members. |
||
| + | |||
| − | |- |
||
| + | [[File:Lady Anacondra.jpg|thumb|Lady Anacondra]] |
||
| − | | Now That's an Achievement || Earn 5,000 guild achievement points. |
||
| + | |||
| − | |- |
||
| + | When you enter the instance, first talk to the [[Disciple of Naralex]] for a free druid buff. Continue to follow the path killing all in your way until you reach a large cavern area - Screaming Gully. Be warned - the raptors will call for help when almost dead. In this room is one of the four [[Fanglords]], named "{{NPC||Lady Anacondra}}". She will spawn in one of four different locations, as depicted in the map above. She is similar to the other druids in the Wailing Caverns but she does have higher hitpoints and typically has several deviate raptors with her. These can pose a severe risk if they all attack at once. Players should be cautious and pull these separately if possible. |
||
| − | | Kill Squad || Get 1,000,000 honorable kills. |
||
| + | |||
| − | |- |
||
| + | Kill any mobs Lady Anacondra has with her, and then focus on her. She will cast [[Sleep]] fairly often, and the Druids of the Fang around her will cast it as well. If you have a [[shaman]] with you, [[Tremor Totem]]s will help counteract her Sleep spells. [[Priest]]s can use [[Dispel Magic]] to remove the effect on party members. Lady Anacondra is easy, just watch out for additional monsters. |
||
| − | | Creepjackers || Get 2,500,000 honorable kills. |
||
| + | |||
| − | |- |
||
| + | Lady Anacondra often drops {{loot|rare|Serpent's Shoulders}} and is near the entrance, and is well worth farming just for that item. |
||
| − | | City Attacker || Kill 500 enemy players in any Horde home city. |
||
| + | |||
| − | |- |
||
| + | Be aware that the mobs in the entrance area, including the Fanglords, but not including Lady Anacondra, eventually respawn, and may have to be dealt with multiple times as you cross this area, depending on how rapidly you complete the other portions of this instance. Characters that die and run back to the instance will also have to deal with these, and may not be capable, isolated from the party. |
||
| − | | City Attacker || Kill 500 enemy players in any Alliance home city. |
||
| + | |||
| − | |- |
||
| + | ====Kresh & Lord Cobrahn ==== |
||
| − | | Active Duty || Win 500 Battlegrounds while in a guild group. |
||
| + | * West area of the instance aka Pit of Fangs |
||
| − | |- |
||
| + | After Lady Anacondra, you can either go to the east or west along the river. However, heading west to kill {{NPC||Lord Cobrahn}} is faster and more convenient. If you want to go east first, skip down to that section then come back here. |
||
| − | | Call of Duty || Win 1,000 Battlegrounds while in a guild group. |
||
| + | |||
| − | |- |
||
| + | Jump down into the water and head west. Somewhere along this river, you'll meet a [[turtle]] called {{NPC||Kresh}}. He wanders around in the waters that run through the dungeon. Kresh is a non-aggressive turtle and no tougher than any of the normal elite mobs. He drops a really nice blue shield ({{loot|rare|Kresh's Back}} or {{loot|rare|Worn Turtle Shell Shield}}) or can be tamed by a hunter. (Prior to [[patch 3.0.2]] Kresh in the Wailing Caverns and Ghamoo-ra in Blackfathom Deeps were the only low level (20ish) turtles that knew [[Shell Shield]], so Kresh was often tamed.) Killing Kresh is not necessary to complete the instance, and you can ignore him. |
||
| − | | Tour of Duty || Win 1,500 Battlegrounds while in a guild group. |
||
| − | |- |
||
| − | | 5-Cap Crew || Win 10 Arathi Basin matches while controlling all 5 flags in a guild group. |
||
| − | |- |
||
| − | | Horde Slayer || Complete the slayer achievements listed below. || Guild Page |
||
| − | |- |
||
| − | | Alliance Slayer || Complete the slayer achievements listed below. || Guild Page |
||
| − | |- |
||
| − | | Orc Slayer || Get an honorable kill on each of the level 85 Orc races listed below. |
||
| − | |- |
||
| − | | Human Slayer || Get an honorable kill on each of the level 85 Human races listed below. |
||
| − | |- |
||
| − | | Night Elf Slayer || Get an honorable kill on each of the level 85 Night Elf races listed below. |
||
| − | |- |
||
| − | | Dwarf Slayer || Get an honorable kill on each of the level 85 Dwarf races listed below. |
||
| − | |- |
||
| − | | Draenei Slayer || Get an honorable kill on each of the level 85 Draenei races listed below. |
||
| − | |- |
||
| − | | Worgen Slayer || Get an honorable kill on each of the level 85 Worgen races listed below. |
||
| − | |- |
||
| − | | Tauren Slayer || Get an honorable kill on each of the level 85 Tauren races listed below. |
||
| − | |- |
||
| − | | Undead Slayer || Get an honorable kill on each of the level 85 Undead races listed below. |
||
| − | |- |
||
| − | | Troll Slayer || Get an honorable kill on each of the level 85 Troll races listed below. |
||
| − | |- |
||
| − | | Blood Elf Slayer || Get an honorable kill on each of the level 85 Blood Elf races listed below. |
||
| − | |- |
||
| − | | Goblin Slayer || Get an honorable kill on each of the level 85 Goblin races listed below. |
||
| − | |- |
||
| − | | Tol Barad Brigade || Win 500 battles for Tol Barad while in a guild group. |
||
| − | |- |
||
| − | | The Peak of Perfection || Win 100 rated Twin Peaks matches with a score of 3 to 0 without dying while also getting at least 1 killing blow while in a guild group. |
||
| − | |- |
||
| − | | Guild Gankin' in Gilneas || Win 100 rated the Battle For Gilneas matches with a score of 2,000 to 0 while in a guild group. |
||
| − | |- |
||
| − | | Storming the Beach || In a rated Strand of the Ancients match, capture the Titan Relic in under four minutes 100 times while in a guild group. |
||
| − | |- |
||
| − | | Guild Commanders || Earn the Commander title on all of the classes below. |
||
| − | |- |
||
| − | | Guild Champions || Earn the Champion title on all of the classes below. |
||
| − | |- |
||
| − | | Guild Marshals || Earn the Marshal title on all of the classes below. |
||
| − | |- |
||
| − | | Guild Generals || Earn the General title on all of the classes below. |
||
| − | |- |
||
| − | | Guild Field Marshals || Earn the Field Marshal title on all of the classes below. |
||
| − | |- |
||
| − | | Guild Warlords || Earn the Warlord title on all of the classes below. |
||
| − | |- |
||
| − | | Guild Grand Marshals || Earn the Grand Marshal title on all of the classes below. |
||
| − | |- |
||
| − | | Guild High Warlords || Earn the High Warlord title on all of the classes below. |
||
| − | |- |
||
| − | | Guild Battlemasters || Earn the Battlemaster title on all of the classes below. |
||
| − | |- |
||
| − | | Call of Battle || Win a ranked arena match while in a guild group. |
||
| − | |- |
||
| − | | Guild Rivals || Earn the Rival title on all of the classes below. |
||
| − | |- |
||
| − | | Guild Duelists || Earn the Duelist title on all of the classes below. |
||
| − | |- |
||
| − | | Guild Gladiators || Earn the Gladiator title on all of the classes below. |
||
| − | |} |
||
| + | Climb the circuitous path up from Kresh's pool. Once you have traveled up the path you will find yourself in a big room filled with random monsters. Just follow the path and clear the monsters. Most of them are easy to kill, but be careful of additional monsters who wander around. After defeating the monsters you will find "Lord Cobrahn", another one of the four Fanglords. |
||
| − | {| class="darktable sortable zebra plainlinks" align=center |
||
| + | |||
| − | |+Professions |
||
| + | Lord Cobrahn is the easiest of the Fanglords. A [[mage]] can [[AoE]] the non-elite snakes and start beating Cobrahn down. When he gets low on health, he will turn into a rather large snake and his DPS will increase slightly. Just keep attacking him and he should drop fast. Like Lady Anacondra, with a decent group this fight is easily won. Lord Cobrahn may drop {{loot|rare|Robe of the Moccasin}}. |
||
| + | |||
| + | ==== Lord Pythas & Skum ==== |
||
| + | * Far eastern area of the instance aka Winding Chasm |
||
| + | Jump off the cliff, you'll return to the main room and go east. Watch your minimap as you progress; the eastern caverns often fork, but most paths are circuitous and rejoin. One fork in particular is critical, one branch leads to the easternmost section, clearly isolated from the rest of the path. Do that one first, but remember where this fork is. After a lot of killing and slaughtering you will find "{{NPC||Lord Pythas}}", another one of the 4 Fanglords. Pythas is the toughest of the Leaders of the Fang. He puts out a lot of melee damage, and he has a lot of hitpoints. A 5 person level 30+ group has been observed to wipe due to Pythas before, if that gives any idea of his potential level of difficulty. (Said group was 8+ levels above Pythas) |
||
| + | |||
| + | The single main reason why Pythas often causes wipes is because he has two elite Druids and at least one elite Shambler with him. These additional mobs in themselves are not the problem; the problem is that because there are so many mobs present, players generally will not have any idea what to attack first. While players are standing still, trying to decide which mob to attack first, Pythas and the other mobs thus surround the players and exterminate them fairly quickly. |
||
| + | |||
| + | The most straightforward way of dealing with Pythas requires a mage. Have the mage [[polymorph]] (sheep) Pythas and keep re-applying polymorph for as long as is necessary, while the rest of the group can then carefully kill the surrounding mobs. Once the surrounding mobs are dead, the players can then deal with Pythas on his own. |
||
| + | |||
| + | Pythas is susceptible to sap, so a rogue can keep him out of the action until the other mobs are dealt with. |
||
| + | |||
| + | Be very careful that [[AoE]]s do not break these controls. |
||
| + | |||
| + | If you don't have a mage or rogue with you, things can be a little more tricky. If your group has either a [[hunter]] or a [[warlock]], (A group with two hunters is not an unusual group configuration for this instance) have these characters send their [[pet]]s to keep Pythas occupied while the group gets rid of the surrounding mobs, and so can then target Pythas on his own. |
||
| + | |||
| + | The {{NPC||Deviate Faerie Dragon}} is a rare mob you may encounter in this area. Not difficult, drops nice caster gear, but appears rarely. Odds are good that you will never see him unless you enter the instance repeatedly to hunt for him. |
||
| + | |||
| + | The next (optional) boss along the path is "{{NPC||Skum}}", a big old [[thunder lizard]]. Skum generally won't cause you any serious problems himself, but in addition to the two druids guarding his pen, there are usually a number of other druids, dreadfangs, and oozes nearby, which you may want to remove before killing Skum himself. Skum drops a semi-good dagger, {{loot|rare|Tail Spike}}, or a high agility cape, {{loot|rare|Glowing Lizardscale Cloak}} so if you have any [[rogue]]s or hunters you may as well drop him. Skum's just an elite thunder lizard. |
||
| + | |||
| + | As you progress through the dungeon you must increasingly watch out and make sure not to pull too many of the large amounts of elites. |
||
| + | |||
| + | ==== Lord Serpentis & Verdan the Everliving ==== |
||
| + | * Closer eastern area of the instance |
||
| + | Backtrack to the fork that you took to the easternmost part of the cavern, and take the other branch. It should climb up a long pathway to a cliff edge. The path continues beyond the cliff; there is a gap and a drop. Jump down across the gap. (This is a one-way path.) Make sure you warn everyone in your party about the gap and the drop ahead of time, or you'll sit around waiting for them to climb back (and possibly rez, if they died from the fall.) You can have your mage cast [[slow fall]] on everyone and then just run across and float down. |
||
| + | |||
| + | [[File:Verdan the Everliving.jpg|thumb|Verdan the Everliving]] |
||
| + | |||
| + | Eventually you will find a big room with "{{NPC||Verdan the Everliving}}" and "{{NPC||Lord Serpentis}}". |
||
| + | Serpentis is a very standard melee fighter for the most part, with less hit points than Pythas. Kill any of the random mobs around Serpentis first, don't let him get past your tank(s), and don't get near and aggro Verdan the Everliving, and you should be fine. |
||
| + | |||
| + | {{NPC||Verdan the Everliving}} on the other hand is a very different story. Make sure you've cleared all of the other mobs first. You will probably want the entire group to be at least level 19-20, and a healer is a must. Keep Verdan focused on your [[warrior]], although pets can also help share the load if you have them. The healer needs to keep an eye on the warrior constantly. Mages/other [[DPS]] classes can also pitch in, but they will need to attack carefully to make sure they do not pull Verdan's attention away from the tank. Killing Verdan is optional, he is not the object of any quest. ('''Note:''' One comment on WoWHead claims that the Glowing Shard will not drop from Mutanus if Verdan is not killed. This could account for the apparent drop rate on an item that seems that it ought to be 100% and for the wide divergence of the reported values. (see external links below)) |
||
| + | |||
| + | Verdan should be the last boss that you need to kill on the East side of the instance, so you can quickly return to the central chamber by running to the back of the room where Verdan was and jump down the hole on the right side of the cliff behind Verdan. You'll land in a deep pool of water just off the main entrance chamber. If you choose not to fight Verdan the Everliving, you'll have to walk back to the entrance jumping down at some place, because of the one way ledge jump, or if all of your party is at least level 19, you might be able to hug the walls and go around Verdan the Everliving and jump down the pit. Either side is far enough from Verdan not to aggro him as long as you stay on the walls. |
||
| + | |||
| + | ====End of dungeon event==== |
||
| + | *Awaken [[Naralex]] |
||
| + | After you've killed all four Leaders of the Fang, go back to the entrance and speak with the [[tauren]] druid [[Disciple of Naralex]] to start the Naralex event. You'll have to escort the Disciple through a path of mobs to wake up Naralex. |
||
| + | |||
| + | There is a preliminary step which will make this much easier. While you were doing the rest of the instance, the mobs in the entrance area have respawned. You will have to escort the Disciple of Naralex through this area, so before talking to him, clear this area again. He will walk from his entrance area around the western side of the entrance area to the pool in the north, so you can ignore the eastern side of the entrance area. Also, the [[crocolisk]]s do not climb up to the path to attack him. |
||
| + | |||
| + | Even if you clear the path, there are two set points along his path at which mobs will spawn; dispatch them when they appear. (At one, he conducts a ceremony to banish the spirits of the Leaders of the Fang from the caverns, and serpents appear with names suggesting they represent the spirits being banished.) None of these are particularly difficult. |
||
| + | |||
| + | [[File:Mutanus the Devourer.jpg|thumb|Mutanus the Devourer]] |
||
| + | When you reach Naralex, the Disciple will begin to wake him. You must continue to protect the Disciple while he wakes Naralex. A few waves of mobs spawn, serpents, then slimes, that can be easily dispatched. You get enough time to eat and drink between waves of mobs, if everyone stays on the island and deals with the current wave quickly enough. |
||
| + | |||
| + | Note: High-level players doing this event should resist the temptation to kill every mob before it reaches the Disciple, because if the Disciple takes no damage while channeling his awakening spell, the event will bug and you will be unable to complete the instance. Some have suggested that pulling a mob from elsewhere in the instance and inducing it to attack the Disciple (e.g. a Hunter pulling a mob to the room and then using [[Feign Death]]) might cause the event to continue, but this does not work. Let at least one serpent or ooze hit the Disciple before killing them all. |
||
| + | |||
| + | The last spawn is the boss "{{NPC||Mutanus the Devourer}}", a huge [[murloc]]. You won't have a long rest before him, Mutanus comes up rather quickly, but you should be able to get everyone's health and mana restored. Mutanus can be tough depending on who you have in your party. He is at least partially immune to Shadow damage. Mutanus spawns waves of shadow mobs that appear to be just a distraction and disappear quickly on their own. If he catches you off-guard, he could potentially wipe out your group. Make sure you eat and drink before he spawns, and you shouldn't have any problem dispatching him. However, if you could take Verdan then Mutanus should be a bit easier. |
||
| + | |||
| + | After Mutanus is slain, congratulations! You beat the Wailing Caverns! Everyone in the party should loot the {{loot|common|Glowing Shard}} quest item from the corpse of Mutanus if it drops (variously quoted as 60% to 67% odds). |
||
| + | |||
| + | ====End animation==== |
||
| + | Naralex and the Disciple turn into owls and fly away. |
||
| + | |||
| + | In prior patches, after Naralex is awakened by the Disciple (i.e., Mutanus is defeated), Naralexx would turn into an owl and fly away. Amusingly, the Disciple would not transform, but would float away as a standing tauren in the same spiraling flight path as his boss. This earned the Disciple the nickname "hovercow". Sadly, this has been addressed, and the flight of the "hovercow" is part of the [[Dreaming]]. |
||
| + | |||
| + | ===Caution=== |
||
| + | Only the mobs in the entrance area appear to respawn. Groups sometimes do the bosses in an inconvenient order and get discouraged when they drop down into the central pool and discover that "the instance is respawning"; it's not the instance, it's just the entrance. It is, however, very inconvenient because the lowbies in the group will tend to die, and may have to contend with a populated entrance. Plan for this. The best route is having a rez capability and not releasing upon death. |
||
| + | |||
| + | You might also notice that dealing with the Disciple of Naralex lacks the mechanics of a quest. That means you cannot complete The Wailing Caverns incrementally; in order to spawn Mutanus, you must kill the four Leaders of the Fang in one session. You can complete the associated quests incrementally. |
||
| + | |||
| + | During the final event, part of your job is to protect the Tauren as he awakens Naralexx. A glitch may occur that will allow the Tauren to die but continue the event as normal.{{fact}} It is unknown whether or not this has been fixed. Also ths instance is known as the Glitchiest dungeon in the game, with mobs spawning in rocks, invisible unattackable mobs and players recieving no damage but dying instantly with reports of a lvl 80 farming wool cloth dying because of this glitch. |
||
| + | |||
| + | ===Tactics=== |
||
| + | Since it is a fairly long instance to run through, and there are various quests and special mobs to kill, it is obvious that there are certain tactics that need to be followed in order to succeed in the Wailing Caverns. |
||
| + | |||
| + | The mobs in WC range from 15-20 elite and are generally found in groups of 3, with the occasional group of 4 or 5. Some of the enemies (the [[Druid of the Fang|Druids of the Fang]] ) will flee when brought low enough, which can be deadly to a group if there is another enemy group nearby. |
||
| + | |||
| + | Being a level 15-20 instance, with the mobs being 15-20 elite you will HAVE to work together as a team, especially if you are at the low end of the level scale. Most players in the correct level range will not be able to handle an elite mob of their level or higher on their own. The best tactic to deal with this is to designate a single player to pull mobs (the tank) and be careful to not pull anything other than what is planned. If you are the puller always plan the pull carefully. This means, watching for patrols, movement of mobs, and party health and mana. If you do these things even a party of all 15-18 characters stands an excellent chance at finishing the instance. |
||
| + | |||
| + | There are several key tactical issues to keep in mind for this specific instance. |
||
| + | |||
| + | The [[Druid of the Fang|Druids of the Fang]] deserve a special mention, they'll engage first with lightning bolts, and then shapeshift into Cobras to engage in melee. When heavily damaged, they'll morph back to heal themselves. Each [[Druid of the Fang]] is also capable of putting a party member to sleep. If you have a shaman, tell him/her to use a Tremor Totem whenever someone's asleep, and use [[Wind Shear]] to disrupt a druid's initial lightning bolt to force them to charge. Also save a [[kick]], shock, or [[counterspell]] for their final heal. The same technique can be used to fight each of the Leaders of the Fang. [[Deviate Shambler]]s later can cast regeneration on themselves, purge utterly counters this. |
||
| + | |||
| + | In WC it is critical to control mobs from fleeing combat. The [[Druid of the Fang|Druids of the Fang]] all flee combat at roughly 1/5th heath. Allowing them to flee when another mob is nearby can be a quick death sentence for your group. A safe fight can quickly turn into being outnumbered if a mob pulls in two to 3 additional mobs. |
||
| + | |||
| + | The other key is to make sure that you are able to deal with all the Fanglords present in the instance. Aside from the quest which involves collecting their gems, once all of the Fanglords are killed you will be able to do a final boss in the instance which will lead you to a new quest line. The order of their deaths does not matter, only that they all die. |
||
| + | |||
| + | |||
| + | ==Quest guide== |
||
| + | {| class="darktable" |
||
| + | ! Quest Name |
||
| + | ! Quest Giver |
||
| + | ! Zone Location |
||
|- |
|- |
||
| + | !colspan="3"|{{Horde Icon Small}} Horde Quests |
||
| − | ! Title !! class=unsortable | Description !! Reward |
||
|- |
|- |
||
| + | | {{questlong|Horde|10|The Barrens Oases}} (Optional) |
||
| − | | Skinnin' For A Livin' || Skin 10,000 corpses. |
||
| + | | {{RaceIcon|Tauren|Male|Small}}{{NPC|Horde|Arch Druid Hamuul Runetotem}} |
||
| + | | [[Elder Rise]], [[Thunder Bluff]] |
||
|- |
|- |
||
| + | | *{{questlong|Horde|13|The Forgotten Pools}} (Chain prelim) |
||
| − | | Mix Master || Craft 10,000 Cataclysm flasks. |
||
| + | | {{RaceIcon|Tauren|Male|Small}}{{NPC|Horde|Tonga Runetotem}} |
||
| + | | [[The Crossroads]], [[the Barrens]] |
||
|- |
|- |
||
| + | | **{{questlong|Horde|16|The Stagnant Oasis}} (Chain prelim) |
||
| − | | Dust, Dust and more Dust| || Disenchant 10,000 items. |
||
| + | | {{RaceIcon|Tauren|Male|Small}}{{NPC|Horde|Tonga Runetotem}} |
||
| + | | [[The Crossroads]], [[the Barrens]] |
||
|- |
|- |
||
| + | | ***{{questlong|Horde|16|Altered Beings}} (Chain prelim) |
||
| − | | Dinner Party || Place 5,000 Feasts. |
||
| + | | {{RaceIcon|Tauren|Male|Small}}{{NPC|Horde|Tonga Runetotem}} |
||
| + | | [[The Crossroads]], [[the Barrens]] |
||
|- |
|- |
||
| + | | ****{{questlong|Horde|16|Hamuul Runetotem}} (Chain prelim) |
||
| − | | Bushels and Bushels || Gather 50,000 herbs. |
||
| + | | {{RaceIcon|Tauren|Male|Small}}{{NPC|Horde|Tonga Runetotem}} |
||
| + | | [[The Crossroads]], [[the Barrens]] |
||
|- |
|- |
||
| + | | *****{{questlong|Horde|16|Nara Wildmane}} (Chain prelim) |
||
| − | | Mighty Miners || Mine 50,000 ore and rocks. |
||
| + | | {{RaceIcon|Tauren|Male|Small}}{{NPC|Horde|Arch Druid Hamuul Runetotem}} |
||
| + | | [[Elder Rise]], [[Thunder Bluff]] |
||
| + | |- class="alt" |
||
| + | | ******{{questlong|Horde|22|Leaders of the Fang}} |
||
| + | | {{RaceIcon|Tauren|Female|Small}}{{NPC|Horde|Nara Wildmane}} |
||
| + | | [[Elder Rise]], [[Thunder Bluff]] |
||
|- |
|- |
||
| + | | {{questlong|Horde|15|Fungal Spores}} (Optional) |
||
| − | | Gemcrafter Extrodinare || Cut 10,000 gems. |
||
| + | | {{RaceIcon|Undead|Male|Small}}{{NPC|Horde|Apothecary Helbrim}} |
||
| + | | [[The Crossroads]], [[the Barrens]] |
||
|- |
|- |
||
| + | | *{{questlong|Horde|15|Apothecary Zamah}} (Optional) |
||
| − | | Master Crafter || Craft 1,000 Epic items. |
||
| + | | {{RaceIcon|Undead|Male|Small}}{{NPC|Horde|Apothecary Helbrim}} |
||
| + | | [[The Crossroads]], [[the Barrens]] |
||
| + | |- class="alt" |
||
| + | | **{{questlong|Horde|18|Serpentbloom}} |
||
| + | | {{RaceIcon|Undead|Female|Small}}{{NPC|Horde|Apothecary Zamah}} |
||
| + | | [[Pools of Vision]], [[Thunder Bluff]] |
||
|- |
|- |
||
| + | !colspan="3"|{{Neutral Icon Small}} Neutral Quests |
||
| − | | Fishing Pool Pro || Catch 10,000 fish from Northrend fishing pools. |
||
| + | |- class="alt" |
||
| + | | {{questlong|Neutral|17|Deviate Hides}} |
||
| + | | {{RaceIcon|Tauren|Male|Small}}{{NPC|Neutral|Nalpak}} |
||
| + | | [[Wailing Caverns right eye socket cave]] |
||
| + | |- class="alt" |
||
| + | | {{questlong|Neutral|18|Trouble at the Docks}} |
||
| + | | {{RaceIcon|Goblin|Male|Small}}{{NPC|Neutral|Crane Operator Bigglefuzz}} |
||
| + | | [[Ratchet]], [[the Barrens]] |
||
|- |
|- |
||
| + | | {{questlong|Neutral|18|Raptor Horns}} (Chain prelim) |
||
| − | | The Pen is Mightier || Create 25,000 glyphs. |
||
| + | | {{RaceIcon|Goblin|Male|Small}}{{NPC|Neutral|Mebok Mizzyrix}} |
||
| − | |- |
||
| + | | [[Ratchet]], [[the Barrens]] |
||
| − | | Set the Oven to "Cataclysmic" || Cook 5,000 Cataclysm cooking recipes. |
||
| + | |- class="alt" |
||
| − | |- |
||
| + | | *{{questlong|Neutral|18|Smart Drinks}} |
||
| − | | Time To Open A Restaurant || Cook 10,000 Cataclysm cooking recipes. |
||
| + | | {{RaceIcon|Goblin|Male|Small}}{{NPC|Neutral|Mebok Mizzyrix}} |
||
| − | |- |
||
| + | | [[Ratchet]], [[the Barrens]] |
||
| − | | Making History || Complete 500 Archaeology projects. |
||
| + | |- class="alt" |
||
| − | |- |
||
| + | | {{questlong|Neutral|21|Deviate Eradication}} |
||
| − | | Working as a Team || Obtain 525 skill points in all professions and secondary professions. || {{loot|uncommon|Banner of Cooperation}} |
||
| + | | {{RaceIcon|NightElf|Female|Small}}{{NPC|Neutral|Ebru}} |
||
| − | |- |
||
| + | | [[Wailing Caverns right eye socket cave]] |
||
| − | | Better Leveling Through Chemistry || Create 25,000 Cataclysm flasks. || {{loot|common|Recipe: Big Cauldron of Battle}} |
||
| + | |- class="alt" |
||
| − | |- |
||
| + | | {{questlong|Neutral|26|The Glowing Shard}} (Chain, start) |
||
| − | | Master Crafter || Craft 1,500 Epic items with an item level of at least 359. || {{loot|epic|Cloak of Coordination}} |
||
| + | | [[File:INV Stone 03.png|20px]]{{loot|Common|Glowing Shard}}, drop<br />from [[Mutanus the Devourer]] |
||
| − | |- |
||
| + | | Wailing Caverns |
||
| − | | That's A Lot of Bait || Catch 10,000 fish from fishing pools. || {{loot|rare|Recipe: Seafood Magnifique Feast}} |
||
| − | |- |
+ | |- |
| + | | *{{questlong|Neutral|26|The Glowing Shard}} (Chain, following) |
||
| − | | Like Shooting Fish In A Barrel || Catch 100,000 fish from fishing pools. |
||
| + | | {{RaceIcon|Goblin|Male|Small}}{{NPC|Neutral|Sputtervalve}} |
||
| + | | [[Ratchet]], [[the Barrens]] |
||
| + | |- |
||
| + | | {{questlong|Alliance|25|In Nightmares (Alliance)|In Nightmares}} (Chain, following) <br />'''OR''' (same quest, different endpoints)<br /> {{questlong|Horde|25|In Nightmares (Horde)|In Nightmares}} (Chain, following) |
||
| + | | {{RaceIcon|Tauren|Female|Small}}{{NPC|Neutral|Falla Sagewind}} |
||
| + | | Peak above Wailing Caverns |
||
|} |
|} |
||
| + | ==== Quest reward items ==== |
||
| − | {| class="darktable sortable zebra plainlinks" align=center |
||
| + | {{lootbox|Leaders of the Fang (Horde)|Crescent Staff|Wingblade}} |
||
| − | |+Feats of Strength |
||
| + | {{lootbox|Serpentbloom (Horde)|Apothecary Gloves}} |
||
| − | |- |
||
| + | {{lootbox|Deviate Hides (Neutral)|Slick Deviate Leggings|Deviate Hide Pack}} |
||
| − | ! Title !! class=unsortable | Description !! Reward |
||
| + | {{lootbox|Deviate Eradication (Neutral)|Pattern: Deviate Scale Belt|Sizzle Stick|Dagmire Gauntlets}} |
||
| − | |- |
||
| + | {{lootbox|In Nightmares (Both factions)|Talbar Mantle|Quagmire Galoshes}} |
||
| − | |Realm First| Working as a Team || First guild on the realm to obtain 525 skill points in all professions and secondary professions. |
||
| + | |||
| − | |- |
||
| + | ==={{quest|Deviate Hides}} and {{quest|Deviate Eradication}}=== |
||
| − | |Realm First| Nefarian || First guild on the realm to defeat Nefarian in Blackwing Descent on Heroic difficulty while in a guild group. |
||
| + | These two quests are available from NPCs in a [[Wailing Caverns right eye socket cave|cave]] above the entrance to Wailing Caverns. Looking towards the entrance, the cave is above it and to the left. (The cave entrance resembles a skull — the NPCs are in the "right eye socket".) |
||
| − | |- |
||
| + | |||
| − | |Realm First| Al'Akir || First guild on the realm to defeat Al'Akir in the Throne of the Four Winds on Heroic difficulty while in a guild group. |
||
| + | To reach this cave, you must climb the hill behind the cavern entrance and drop onto a small ledge on the right. It is a small, narrow ledge so you will be best served walking almost parallel to the ledge when dropping (walking rather than running will help with this). It may take several tries. Once you're on the ledge, head into the cave. There are two quest NPCs along with a leatherworking trainer and leatherworking vendor. That vendor sells the {{Loot|Uncommon|Deviate Scale Cloak}} and {{Loot|Uncommon|Deviate Scale Gloves}} recipes with a limited supply. |
||
| − | |- |
||
| + | |||
| − | |Realm First| Sinestra || First guild on the realm to defeat Sinestra in the Bastion of Twilight on Heroic difficulty while in a guild group. |
||
| + | ===Non-elite quests=== |
||
| − | |- |
||
| + | Since Patch 2.4 demoted the mobs outside Wailing Caverns to Non-Elite status, the quests for {{quest|Deviate Hides}}, {{quest|Serpentbloom}}, and {{quest|Trouble at the Docks}} can now all be done without a group at the appropriate level. |
||
| − | |Realm First| Guild Level 25 || First guild on the realm to reach guild level 25. |
||
| + | |||
| − | |} |
||
| + | ===Instance quests=== |
||
| + | {{questlong|Horde|22|Leaders of the Fang}} and {{quest|Deviate Eradication}} can only be accomplished in the instance. {{quest|The Glowing Shard}} can only be obtained by looting the {{loot|Common|Glowing Shard}} after completing the instance. Watch your progress on the Deviate Eradication quest; the mobs you need to kill only occur in specific sections of the instance, and you need to make sure you get credit for enough kills to turn in the quest. |
||
| + | |||
| + | == Resources == |
||
| + | * [[Herb]]s |
||
| + | ** {{loot|common|Earthroot}} |
||
| + | ** {{loot|common|Mageroyal}} |
||
| + | ** {{loot|common|Bruiseweed}} |
||
| + | ** {{loot|common|Kingsblood}} |
||
| + | ** {{loot|common|Liferoot}} |
||
| + | |||
| + | * [[Leather]] |
||
| + | ** {{loot|common|Light Leather}} - this is the most common leather skinned in the instance. |
||
| + | ** {{loot|common|Medium Leather}} |
||
| + | ** {{loot|common|Light Hide}} |
||
| + | ** {{loot|common|Medium Hide}} |
||
| + | ** {{loot|common|Deviate Scale}} (Skinning and looting level 15-22 [[beast]]s)) |
||
| + | ** {{loot|common|Perfect Deviate Scale}} (Skinning and looting level 15-22 [[beast]]s) |
||
| + | ** no {{loot|common|Ruined Leather Scraps}} in the instance! |
||
| + | |||
| + | * [[Mining|Ore Veins]] |
||
| + | ** [[Copper Vein]] |
||
| + | ** [[Tin Vein]] |
||
| + | ** [[Silver Vein]] |
||
| + | * [[Cloth]] and [[First Aid]] |
||
| − | == References == |
||
| + | ** The Druids of the Fang drop a fair amount of cloth, |
||
| − | {{reflist}} |
||
| + | ***{{loot|common|Linen Cloth}} |
||
| + | ***{{loot|common|Wool Cloth}} |
||
| + | * [[Food]] and [[Cooking]] |
||
| − | == External links == |
||
| + | ** The [[Deviate Lasher]]s in the eastern parts of the caverns always drop [[fungus]], |
||
| − | <!-- Read http://www.wowpedia.org/Wowpedia:External_links before posting your links here. |
||
| + | *** often {{loot|common|Forest Mushroom Cap}} (61 health over 18 seconds) |
||
| + | *** sometimes {{loot|common|Red-speckled Mushroom}} (243 health over 21 seconds) |
||
| + | *** sometimes {{loot|common|Spongy Morel}} (552 health over 24 seconds) |
||
| + | ** The [[Deviate Crocolisk]]s in the river often drop {{loot|common|Crocolisk Meat}} |
||
| + | ** There are numerous [[Cooking Fire|cooking fires]] available |
||
| + | |||
| + | *[[Fishing]] |
||
| + | ** The waters of the cavern, both inside the instance and outside the instance, can be fished. |
||
| + | ** These waters and the waters of the three Barrens oases are among the few sources for {{loot|common|Deviate Fish}} |
||
| + | |||
| + | *[[Reagent]]s |
||
| + | ** The various kinds of [[wind serpent]]s in the caverns often drop {{loot|common|Light Feather}} |
||
| + | |||
| + | ==Dungeon denizens== |
||
| + | * {{RaceIconExt|BogBeast|Small}} [[Bog beast]]s |
||
| + | * {{RaceIconExt|Crocolisk|Small}} [[Crocolisk]]s |
||
| + | * {{RaceIconExt|FaerieDragon|Small}} [[Faerie dragon]]s (one, the {{NPC||Deviate Faerie Dragon}}) |
||
| + | * {{RaceIcon|Goblin|Small}} [[Goblin]]s (one, {{NPC||Mad Magglish}}) |
||
| + | * {{RaceIconExt|Hydra|Small}} [[Hydra]]s (one, {{NPC||Trigore the Lasher}}, in the pre-instance entrance area) |
||
| + | * {{RaceIconExt|Lasher|Small}} [[Lasher]]s |
||
| + | * {{RaceIconExt|Murloc|Small}} [[Murloc]]s (one, {{NPC||Mutanus the Devourer}}) |
||
| + | * {{RaceIcon|NightElf|Male|Small}}{{RaceIcon|NightElf|Female|Small}} [[Night elves]] |
||
| + | * {{RaceIconExt|Ooze|Small}} [[Ooze]]s |
||
| + | * {{RaceIconExt|Raptor|Small}} [[Raptor]]s |
||
| + | * {{RaceIconExt|Serpent|Small}} [[Serpent]]s |
||
| + | * {{RaceIconExt|Snake|Small}} [[Snake]]s |
||
| + | * {{RaceIcon|Tauren|Male|Small}} [[Tauren]] (three, the {{NPC||Disciple of Naralex}} in the instance and {{NPC||Nalpak}} and {{NPC||Waldor}} in the eye socket cave) |
||
| + | * {{RaceIconExt|Threshadon|Small}} [[Threshadon]]s (pre-instance entrance area) |
||
| + | * {{RaceIconExt|ThunderLizard|Small}} [[Thunder lizard]]s (one, {{NPC||Skum}}) |
||
| + | * {{RaceIconExt|Turtle|Small}} [[Turtle]]s (one, {{NPC||Kresh}}) |
||
| + | * {{RaceIconExt|Frog|Small}} [[Toad]]s (critters) |
||
| + | * {{RaceIconExt|WindSerpent|Small}} [[Wind serpent]]s |
||
| + | |||
| + | == Loot == |
||
| + | See [[Wailing Caverns loot]]. |
||
| + | |||
| + | == Notes == |
||
| + | * Also known as WC (not to be confused with {{quest|Warlord's Command}}, a high level quest with the same abbreviation) |
||
| + | * Found in the [[Barrens]], to the south of [[Crossroads]], on the north side of the [[Lushwater Oasis]]. |
||
| + | * Enemy Level Range: |
||
| + | ** Outside Instance: 11-17 |
||
| + | ** Inside Instance: 18-20 (Elite) |
||
| + | * Must be at least level 10 to enter the instance. |
||
| + | * The Druids of the Fang (as well as any other nearby raptors) will come to the aid of any Raptors that call for help; make sure to pull raptors away from the druids and other raptors, unless you can handle the adds. |
||
| + | * Rogues, don't forget to pick pocket the druids after you've sapped them. |
||
| + | |||
| + | ==Patch changes== |
||
| + | * {{Patch 1.5.0|note=New load screen added.}} |
||
| + | * {{Patch 1.3.0|note=Capped at ten players.}} |
||
| + | |||
| + | ==External links== |
||
| + | <!-- Read http://www.wowwiki.com/WoWWiki:External_links before posting your links here. |
||
Links that do not conform to the rules will be DELETED. |
Links that do not conform to the rules will be DELETED. |
||
Repeat violations may result in a BAN. |
Repeat violations may result in a BAN. |
||
Have a nice day. :) --> |
Have a nice day. :) --> |
||
| + | {{elinks-zone|718|armory=1}} |
||
| − | * {{elink|icon=mmochampion|site=MMO-Champion|link=http://www.mmo-champion.com/content/1954-Cataclysm-Beta-Build-12857-(Codename-Ninja)|desc=Cataclysm Beta - Build 12857 (Codename Ninja)}} |
||
| + | {{Wailing Caverns Subzones}} |
||
| − | * {{elink|icon=mmochampion|site=MMO-Champion|link=http://www.mmo-champion.com/content/1975-Cataclysm-Beta-Build-12984-(Codename-Puppy)|desc=Cataclysm Beta - Build 12984 (Codename Puppy)}} |
||
| + | {{Instancefooter|World of Warcraft}} |
||
| + | |||
| + | [[es:Wailing Caverns]] |
||
| − | {{achievements}} |
||
| + | [[fr:Cavernes des lamentations]] |
||
| − | [[Category:World of Warcraft achievements|Guild achievements]] |
||
| + | [[Category:Instances]] |
||
| + | [[Category:Wailing Caverns| ]] |
||
| + | [[Category:Walkthroughs]] |
||
| + | [[Category:Caves]] |
||
| + | [[Category:Instance loot]] |
||
Revision as of 12:25, 2 December 2010
| Wailing Caverns | |||||||||||
|---|---|---|---|---|---|---|---|---|---|---|---|
| WC | |||||||||||
 Wailing Caverns loading graphic | |||||||||||
| Location | Lushwater Oasis, The Barrens | ||||||||||
| Race(s) |
| ||||||||||
| End boss | Mutanus the Devourer | ||||||||||
| Advised level | 15-25 | ||||||||||
| Minimum level | 10 | ||||||||||
| Player limit | 5 (10) | ||||||||||
| |||||||||||
Wailing Caverns bosses
The Wailing Caverns in the Barrens is one of the first instanced dungeons (outside of a major city) that lower-level Horde players encounter. It is also worthwhile for Alliance characters to run, though possibly inconvenient, as it is located in Horde territory. The new Dungeon Finder system helps address this since players can teleport to the instance, but first require to "find" the instance area in The Barrens before the instance unlocks and becomes available to join. While the level of relative difficulty is fairly low, this instance is quite large and a minimum of 180 minutes (three hours) should be set aside by players wishing to complete it.
This instance is extremely conducive to solo play for characters of most classes after around level 30 to 35. At these levels one will be all but immune to some of the more troublesome effects, such as the Druids of the Fang's sleep spell. Those under level 40 should exercise caution when pulling mobs.
One primary reason to venture into the Wailing Caverns is for BoP drops from the numerous bosses in the instance. Some of the quest rewards are also highly desirable. Both of the rewards from the ![]() [22] Leaders of the Fang quest are blue weapons, which are likely better than anything one will obtain until Shadowfang Keep. The quest item, [Glowing Shard], that drops from the last boss, Mutanus the Devourer, leads to a reward of excellent caster shoulders ([Talbar Mantle]). A large portion of random drops are good BoE gear for levels 10-19. Harvesters will find the yields in The Wailing Caverns are better than the surrounding Barrens, if they have the skill to harvest the better materials. Even the poor quality drops are better than ordinary; a stack of typical trash drops is worth around five to ten silver.
[22] Leaders of the Fang quest are blue weapons, which are likely better than anything one will obtain until Shadowfang Keep. The quest item, [Glowing Shard], that drops from the last boss, Mutanus the Devourer, leads to a reward of excellent caster shoulders ([Talbar Mantle]). A large portion of random drops are good BoE gear for levels 10-19. Harvesters will find the yields in The Wailing Caverns are better than the surrounding Barrens, if they have the skill to harvest the better materials. Even the poor quality drops are better than ordinary; a stack of typical trash drops is worth around five to ten silver.
History
Wailing Caverns entrance
From the World Dungeons page on the official World of Warcraft Community Site:
- Recently, a night elf druid named Naralex discovered a network of underground caverns within the heart of the Barrens. Dubbed the 'Wailing Caverns', these natural caves were filled with steam fissures which produced long, mournful wails as they vented. Naralex believed he could use the caverns' underground springs to restore lushness and fertility to the Barrens - but to do so would require siphoning the energies of the fabled Emerald Dream. Once connected to the Dream however, the druid's vision somehow became a nightmare. Soon the Wailing Caverns began to change - the waters turned foul and the once-docile creatures inside metamorphosed into vicious, deadly predators. It is said that Naralex himself still resides somewhere inside the heart of the labyrinth, trapped beyond the edges of the Emerald Dream. Even his former acolytes have been corrupted by their master's waking nightmare - transformed into the wicked Druids of the Fang.
Geography
Maps

Shrine of the Scarab (region in Wailing Caverns)
Subregions
| Cavern of Mists · Crag of the EverlivingTemplate:Middot Dreamer's RockTemplate:Middot Pit of FangsTemplate:Middot Right eye socket cave (outside and above cave entrance)Template:Middot Screaming GullyTemplate:Middot Winding Chasm |
Walkthrough
Preparation
- Several of the quests within Wailing Caverns are within a quest chain, and cannot be acquired until the previous quests are completed. Examine the quest list and get the quests you want to accomplish within The Wailing Caverns.
- Have plenty of open bag space when you do Wailing Caverns. There are plenty of good drops, so whatever bag space you have will not be enough.
- Be sure to climb to the right eye socket of the cave and pick up the quests before entering the instance. One person can do this, then share the quest with the rest of the party.
General progression
The path to instance
- Entrance area outside of the instance
The part of the dungeon before entering the actual instance is filled with 14-17 raptors, wind serpents, and oozes (before patch 2.3, they were elite). This part is easy, just follow the path till you get to the instance. The one pool on the path that you cannot walk around is a minor trap with two threshadons.
If you are doing Trouble at the Docks, the NPC you are looking for, Mad Magglish, can be found in three different locations. He can be hard to find as he is invisible (when you get close to him he appears and attacks you). Upon entering the cavern you will come to the first intersection (T shaped) where you can go left toward the instance entrance or straight to a small drop off. The small nook to the right is the first location where Mad Magglish may be found. If you can't find him there, proceed down the left passage toward the instance entrance. You will come upon a second intersection where you can go straight (to the instance entrance), go left or go right path. Both the left and right passages lead to a dead-end. You may find Mad Magglish in either the left or right passage (his camping area or the blind alley).
[Serpentbloom] for the Horde quest Serpentbloom, and [Deviate Hides] and [Wailing Essences] for neutral quests Deviate Hides and Smart Drinks can be farmed in this entrance area or in the instance.
This entrance area has the best rate for [Deviate Scale] and [Perfect Deviate Scale].
On a PvP server, this area lacks the protection of being in an instance.
Lady Anacondra
- Entrance area within the instance


Lady Anacondra
When you enter the instance, first talk to the Disciple of Naralex for a free druid buff. Continue to follow the path killing all in your way until you reach a large cavern area - Screaming Gully. Be warned - the raptors will call for help when almost dead. In this room is one of the four Fanglords, named "Lady Anacondra". She will spawn in one of four different locations, as depicted in the map above. She is similar to the other druids in the Wailing Caverns but she does have higher hitpoints and typically has several deviate raptors with her. These can pose a severe risk if they all attack at once. Players should be cautious and pull these separately if possible.
Kill any mobs Lady Anacondra has with her, and then focus on her. She will cast Sleep fairly often, and the Druids of the Fang around her will cast it as well. If you have a shaman with you, Tremor Totems will help counteract her Sleep spells. Priests can use ![]() [Dispel Magic] to remove the effect on party members. Lady Anacondra is easy, just watch out for additional monsters.
[Dispel Magic] to remove the effect on party members. Lady Anacondra is easy, just watch out for additional monsters.
Lady Anacondra often drops [Serpent's Shoulders] and is near the entrance, and is well worth farming just for that item.
Be aware that the mobs in the entrance area, including the Fanglords, but not including Lady Anacondra, eventually respawn, and may have to be dealt with multiple times as you cross this area, depending on how rapidly you complete the other portions of this instance. Characters that die and run back to the instance will also have to deal with these, and may not be capable, isolated from the party.
Kresh & Lord Cobrahn
- West area of the instance aka Pit of Fangs
After Lady Anacondra, you can either go to the east or west along the river. However, heading west to kill Lord Cobrahn is faster and more convenient. If you want to go east first, skip down to that section then come back here.
Jump down into the water and head west. Somewhere along this river, you'll meet a turtle called Kresh. He wanders around in the waters that run through the dungeon. Kresh is a non-aggressive turtle and no tougher than any of the normal elite mobs. He drops a really nice blue shield ([Kresh's Back] or [Worn Turtle Shell Shield]) or can be tamed by a hunter. (Prior to patch 3.0.2 Kresh in the Wailing Caverns and Ghamoo-ra in Blackfathom Deeps were the only low level (20ish) turtles that knew ![]() [Shell Shield], so Kresh was often tamed.) Killing Kresh is not necessary to complete the instance, and you can ignore him.
[Shell Shield], so Kresh was often tamed.) Killing Kresh is not necessary to complete the instance, and you can ignore him.
Climb the circuitous path up from Kresh's pool. Once you have traveled up the path you will find yourself in a big room filled with random monsters. Just follow the path and clear the monsters. Most of them are easy to kill, but be careful of additional monsters who wander around. After defeating the monsters you will find "Lord Cobrahn", another one of the four Fanglords.
Lord Cobrahn is the easiest of the Fanglords. A mage can AoE the non-elite snakes and start beating Cobrahn down. When he gets low on health, he will turn into a rather large snake and his DPS will increase slightly. Just keep attacking him and he should drop fast. Like Lady Anacondra, with a decent group this fight is easily won. Lord Cobrahn may drop [Robe of the Moccasin].
Lord Pythas & Skum
- Far eastern area of the instance aka Winding Chasm
Jump off the cliff, you'll return to the main room and go east. Watch your minimap as you progress; the eastern caverns often fork, but most paths are circuitous and rejoin. One fork in particular is critical, one branch leads to the easternmost section, clearly isolated from the rest of the path. Do that one first, but remember where this fork is. After a lot of killing and slaughtering you will find "Lord Pythas", another one of the 4 Fanglords. Pythas is the toughest of the Leaders of the Fang. He puts out a lot of melee damage, and he has a lot of hitpoints. A 5 person level 30+ group has been observed to wipe due to Pythas before, if that gives any idea of his potential level of difficulty. (Said group was 8+ levels above Pythas)
The single main reason why Pythas often causes wipes is because he has two elite Druids and at least one elite Shambler with him. These additional mobs in themselves are not the problem; the problem is that because there are so many mobs present, players generally will not have any idea what to attack first. While players are standing still, trying to decide which mob to attack first, Pythas and the other mobs thus surround the players and exterminate them fairly quickly.
The most straightforward way of dealing with Pythas requires a mage. Have the mage ![]() [Polymorph] (sheep) Pythas and keep re-applying polymorph for as long as is necessary, while the rest of the group can then carefully kill the surrounding mobs. Once the surrounding mobs are dead, the players can then deal with Pythas on his own.
[Polymorph] (sheep) Pythas and keep re-applying polymorph for as long as is necessary, while the rest of the group can then carefully kill the surrounding mobs. Once the surrounding mobs are dead, the players can then deal with Pythas on his own.
Pythas is susceptible to sap, so a rogue can keep him out of the action until the other mobs are dealt with.
Be very careful that AoEs do not break these controls.
If you don't have a mage or rogue with you, things can be a little more tricky. If your group has either a hunter or a warlock, (A group with two hunters is not an unusual group configuration for this instance) have these characters send their pets to keep Pythas occupied while the group gets rid of the surrounding mobs, and so can then target Pythas on his own.
The Deviate Faerie Dragon is a rare mob you may encounter in this area. Not difficult, drops nice caster gear, but appears rarely. Odds are good that you will never see him unless you enter the instance repeatedly to hunt for him.
The next (optional) boss along the path is "Skum", a big old thunder lizard. Skum generally won't cause you any serious problems himself, but in addition to the two druids guarding his pen, there are usually a number of other druids, dreadfangs, and oozes nearby, which you may want to remove before killing Skum himself. Skum drops a semi-good dagger, [Tail Spike], or a high agility cape, [Glowing Lizardscale Cloak] so if you have any rogues or hunters you may as well drop him. Skum's just an elite thunder lizard.
As you progress through the dungeon you must increasingly watch out and make sure not to pull too many of the large amounts of elites.
Lord Serpentis & Verdan the Everliving
- Closer eastern area of the instance
Backtrack to the fork that you took to the easternmost part of the cavern, and take the other branch. It should climb up a long pathway to a cliff edge. The path continues beyond the cliff; there is a gap and a drop. Jump down across the gap. (This is a one-way path.) Make sure you warn everyone in your party about the gap and the drop ahead of time, or you'll sit around waiting for them to climb back (and possibly rez, if they died from the fall.) You can have your mage cast slow fall on everyone and then just run across and float down.
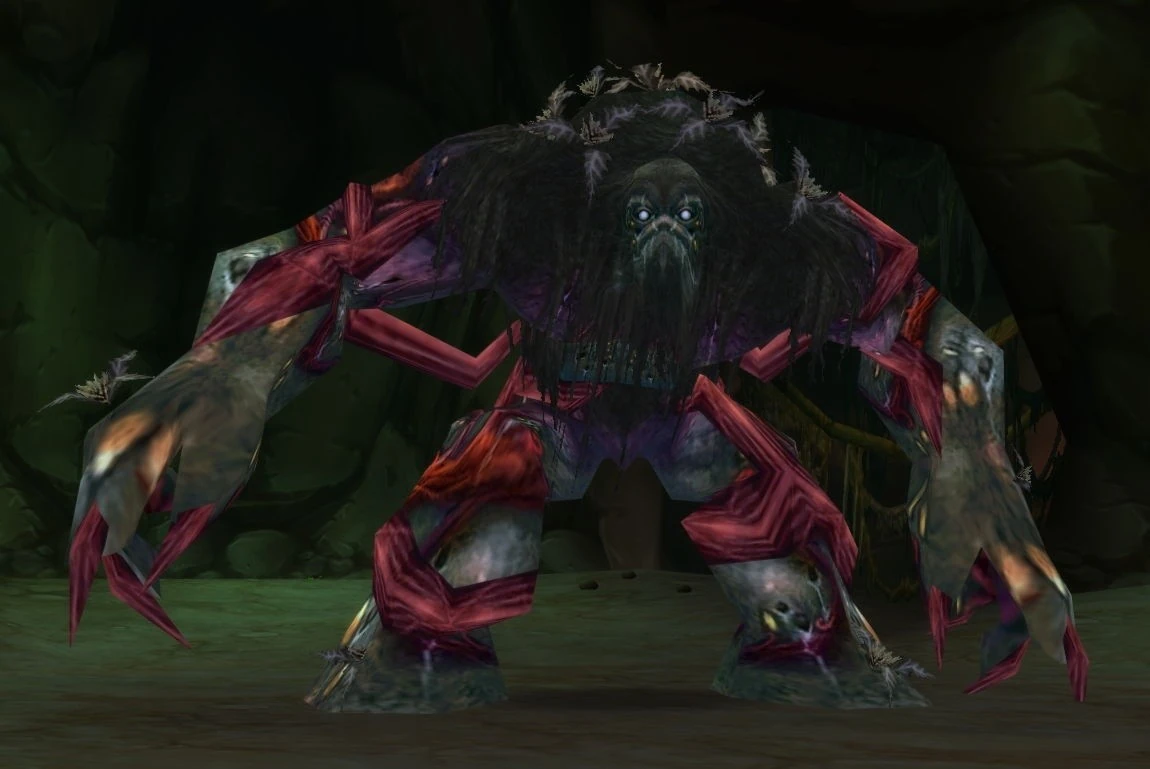

Verdan the Everliving
Eventually you will find a big room with "Verdan the Everliving" and "Lord Serpentis". Serpentis is a very standard melee fighter for the most part, with less hit points than Pythas. Kill any of the random mobs around Serpentis first, don't let him get past your tank(s), and don't get near and aggro Verdan the Everliving, and you should be fine.
Verdan the Everliving on the other hand is a very different story. Make sure you've cleared all of the other mobs first. You will probably want the entire group to be at least level 19-20, and a healer is a must. Keep Verdan focused on your warrior, although pets can also help share the load if you have them. The healer needs to keep an eye on the warrior constantly. Mages/other DPS classes can also pitch in, but they will need to attack carefully to make sure they do not pull Verdan's attention away from the tank. Killing Verdan is optional, he is not the object of any quest. (Note: One comment on WoWHead claims that the Glowing Shard will not drop from Mutanus if Verdan is not killed. This could account for the apparent drop rate on an item that seems that it ought to be 100% and for the wide divergence of the reported values. (see external links below))
Verdan should be the last boss that you need to kill on the East side of the instance, so you can quickly return to the central chamber by running to the back of the room where Verdan was and jump down the hole on the right side of the cliff behind Verdan. You'll land in a deep pool of water just off the main entrance chamber. If you choose not to fight Verdan the Everliving, you'll have to walk back to the entrance jumping down at some place, because of the one way ledge jump, or if all of your party is at least level 19, you might be able to hug the walls and go around Verdan the Everliving and jump down the pit. Either side is far enough from Verdan not to aggro him as long as you stay on the walls.
End of dungeon event
- Awaken Naralex
After you've killed all four Leaders of the Fang, go back to the entrance and speak with the tauren druid Disciple of Naralex to start the Naralex event. You'll have to escort the Disciple through a path of mobs to wake up Naralex.
There is a preliminary step which will make this much easier. While you were doing the rest of the instance, the mobs in the entrance area have respawned. You will have to escort the Disciple of Naralex through this area, so before talking to him, clear this area again. He will walk from his entrance area around the western side of the entrance area to the pool in the north, so you can ignore the eastern side of the entrance area. Also, the crocolisks do not climb up to the path to attack him.
Even if you clear the path, there are two set points along his path at which mobs will spawn; dispatch them when they appear. (At one, he conducts a ceremony to banish the spirits of the Leaders of the Fang from the caverns, and serpents appear with names suggesting they represent the spirits being banished.) None of these are particularly difficult.


Mutanus the Devourer
When you reach Naralex, the Disciple will begin to wake him. You must continue to protect the Disciple while he wakes Naralex. A few waves of mobs spawn, serpents, then slimes, that can be easily dispatched. You get enough time to eat and drink between waves of mobs, if everyone stays on the island and deals with the current wave quickly enough.
Note: High-level players doing this event should resist the temptation to kill every mob before it reaches the Disciple, because if the Disciple takes no damage while channeling his awakening spell, the event will bug and you will be unable to complete the instance. Some have suggested that pulling a mob from elsewhere in the instance and inducing it to attack the Disciple (e.g. a Hunter pulling a mob to the room and then using ![]() [Feign Death]) might cause the event to continue, but this does not work. Let at least one serpent or ooze hit the Disciple before killing them all.
[Feign Death]) might cause the event to continue, but this does not work. Let at least one serpent or ooze hit the Disciple before killing them all.
The last spawn is the boss "Mutanus the Devourer", a huge murloc. You won't have a long rest before him, Mutanus comes up rather quickly, but you should be able to get everyone's health and mana restored. Mutanus can be tough depending on who you have in your party. He is at least partially immune to Shadow damage. Mutanus spawns waves of shadow mobs that appear to be just a distraction and disappear quickly on their own. If he catches you off-guard, he could potentially wipe out your group. Make sure you eat and drink before he spawns, and you shouldn't have any problem dispatching him. However, if you could take Verdan then Mutanus should be a bit easier.
After Mutanus is slain, congratulations! You beat the Wailing Caverns! Everyone in the party should loot the [Glowing Shard] quest item from the corpse of Mutanus if it drops (variously quoted as 60% to 67% odds).
End animation
Naralex and the Disciple turn into owls and fly away.
In prior patches, after Naralex is awakened by the Disciple (i.e., Mutanus is defeated), Naralexx would turn into an owl and fly away. Amusingly, the Disciple would not transform, but would float away as a standing tauren in the same spiraling flight path as his boss. This earned the Disciple the nickname "hovercow". Sadly, this has been addressed, and the flight of the "hovercow" is part of the Dreaming.
Caution
Only the mobs in the entrance area appear to respawn. Groups sometimes do the bosses in an inconvenient order and get discouraged when they drop down into the central pool and discover that "the instance is respawning"; it's not the instance, it's just the entrance. It is, however, very inconvenient because the lowbies in the group will tend to die, and may have to contend with a populated entrance. Plan for this. The best route is having a rez capability and not releasing upon death.
You might also notice that dealing with the Disciple of Naralex lacks the mechanics of a quest. That means you cannot complete The Wailing Caverns incrementally; in order to spawn Mutanus, you must kill the four Leaders of the Fang in one session. You can complete the associated quests incrementally.
During the final event, part of your job is to protect the Tauren as he awakens Naralexx. A glitch may occur that will allow the Tauren to die but continue the event as normal.[citation needed] It is unknown whether or not this has been fixed. Also ths instance is known as the Glitchiest dungeon in the game, with mobs spawning in rocks, invisible unattackable mobs and players recieving no damage but dying instantly with reports of a lvl 80 farming wool cloth dying because of this glitch.
Tactics
Since it is a fairly long instance to run through, and there are various quests and special mobs to kill, it is obvious that there are certain tactics that need to be followed in order to succeed in the Wailing Caverns.
The mobs in WC range from 15-20 elite and are generally found in groups of 3, with the occasional group of 4 or 5. Some of the enemies (the Druids of the Fang ) will flee when brought low enough, which can be deadly to a group if there is another enemy group nearby.
Being a level 15-20 instance, with the mobs being 15-20 elite you will HAVE to work together as a team, especially if you are at the low end of the level scale. Most players in the correct level range will not be able to handle an elite mob of their level or higher on their own. The best tactic to deal with this is to designate a single player to pull mobs (the tank) and be careful to not pull anything other than what is planned. If you are the puller always plan the pull carefully. This means, watching for patrols, movement of mobs, and party health and mana. If you do these things even a party of all 15-18 characters stands an excellent chance at finishing the instance.
There are several key tactical issues to keep in mind for this specific instance.
The Druids of the Fang deserve a special mention, they'll engage first with lightning bolts, and then shapeshift into Cobras to engage in melee. When heavily damaged, they'll morph back to heal themselves. Each Druid of the Fang is also capable of putting a party member to sleep. If you have a shaman, tell him/her to use a Tremor Totem whenever someone's asleep, and use ![]() [Wind Shear] to disrupt a druid's initial lightning bolt to force them to charge. Also save a
[Wind Shear] to disrupt a druid's initial lightning bolt to force them to charge. Also save a ![]() [Kick], shock, or
[Kick], shock, or ![]() [Counterspell] for their final heal. The same technique can be used to fight each of the Leaders of the Fang. Deviate Shamblers later can cast regeneration on themselves, purge utterly counters this.
[Counterspell] for their final heal. The same technique can be used to fight each of the Leaders of the Fang. Deviate Shamblers later can cast regeneration on themselves, purge utterly counters this.
In WC it is critical to control mobs from fleeing combat. The Druids of the Fang all flee combat at roughly 1/5th heath. Allowing them to flee when another mob is nearby can be a quick death sentence for your group. A safe fight can quickly turn into being outnumbered if a mob pulls in two to 3 additional mobs.
The other key is to make sure that you are able to deal with all the Fanglords present in the instance. Aside from the quest which involves collecting their gems, once all of the Fanglords are killed you will be able to do a final boss in the instance which will lead you to a new quest line. The order of their deaths does not matter, only that they all die.
Quest guide
Quest reward items
|
|
|
|
|
Deviate Hides and Deviate Eradication
These two quests are available from NPCs in a cave above the entrance to Wailing Caverns. Looking towards the entrance, the cave is above it and to the left. (The cave entrance resembles a skull — the NPCs are in the "right eye socket".)
To reach this cave, you must climb the hill behind the cavern entrance and drop onto a small ledge on the right. It is a small, narrow ledge so you will be best served walking almost parallel to the ledge when dropping (walking rather than running will help with this). It may take several tries. Once you're on the ledge, head into the cave. There are two quest NPCs along with a leatherworking trainer and leatherworking vendor. That vendor sells the [Deviate Scale Cloak] and [Deviate Scale Gloves] recipes with a limited supply.
Non-elite quests
Since Patch 2.4 demoted the mobs outside Wailing Caverns to Non-Elite status, the quests for Deviate Hides, Serpentbloom, and Trouble at the Docks can now all be done without a group at the appropriate level.
Instance quests
![]() [22] Leaders of the Fang and Deviate Eradication can only be accomplished in the instance. The Glowing Shard can only be obtained by looting the [Glowing Shard] after completing the instance. Watch your progress on the Deviate Eradication quest; the mobs you need to kill only occur in specific sections of the instance, and you need to make sure you get credit for enough kills to turn in the quest.
[22] Leaders of the Fang and Deviate Eradication can only be accomplished in the instance. The Glowing Shard can only be obtained by looting the [Glowing Shard] after completing the instance. Watch your progress on the Deviate Eradication quest; the mobs you need to kill only occur in specific sections of the instance, and you need to make sure you get credit for enough kills to turn in the quest.
Resources
- Leather
- [Light Leather] - this is the most common leather skinned in the instance.
- [Medium Leather]
- [Light Hide]
- [Medium Hide]
- [Deviate Scale] (Skinning and looting level 15-22 beasts))
- [Perfect Deviate Scale] (Skinning and looting level 15-22 beasts)
- no [Ruined Leather Scraps] in the instance!
- Food and Cooking
- The Deviate Lashers in the eastern parts of the caverns always drop fungus,
- often [Forest Mushroom Cap] (61 health over 18 seconds)
- sometimes [Red-speckled Mushroom] (243 health over 21 seconds)
- sometimes [Spongy Morel] (552 health over 24 seconds)
- The Deviate Crocolisks in the river often drop [Crocolisk Meat]
- There are numerous cooking fires available
- The Deviate Lashers in the eastern parts of the caverns always drop fungus,
- Fishing
- The waters of the cavern, both inside the instance and outside the instance, can be fished.
- These waters and the waters of the three Barrens oases are among the few sources for [Deviate Fish]
- Reagents
- The various kinds of wind serpents in the caverns often drop [Light Feather]
Dungeon denizens
- File:IconSmall BogBeast Small.gif Bog beasts
- File:IconSmall Crocolisk Small.gif Crocolisks
- File:IconSmall FaerieDragon Small.gif Faerie dragons (one, the Deviate Faerie Dragon)
- File:IconSmall Goblin Small.gif Goblins (one, Mad Magglish)
- File:IconSmall Hydra Small.gif Hydras (one, Trigore the Lasher, in the pre-instance entrance area)
- File:IconSmall Lasher Small.gif Lashers
- File:IconSmall Murloc Small.gif Murlocs (one, Mutanus the Devourer)
 Night elves
- File:IconSmall Ooze Small.gif Oozes
- File:IconSmall Raptor Small.gif Raptors
- File:IconSmall Serpent Small.gif Serpents
- File:IconSmall Snake Small.gif Snakes
- Tauren (three, the Disciple of Naralex in the instance and Nalpak and Waldor in the eye socket cave)
- File:IconSmall Threshadon Small.gif Threshadons (pre-instance entrance area)
- File:IconSmall ThunderLizard Small.gif Thunder lizards (one, Skum)
- File:IconSmall Turtle Small.gif Turtles (one, Kresh)
- File:IconSmall Frog Small.gif Toads (critters)
- File:IconSmall WindSerpent Small.gif Wind serpents
Loot
See Wailing Caverns loot.
Notes
- Also known as WC (not to be confused with Warlord's Command, a high level quest with the same abbreviation)
- Found in the Barrens, to the south of Crossroads, on the north side of the Lushwater Oasis.
- Enemy Level Range:
- Outside Instance: 11-17
- Inside Instance: 18-20 (Elite)
- Must be at least level 10 to enter the instance.
- The Druids of the Fang (as well as any other nearby raptors) will come to the aid of any Raptors that call for help; make sure to pull raptors away from the druids and other raptors, unless you can handle the adds.
- Rogues, don't forget to pick pocket the druids after you've sapped them.
Patch changes
- Patch 1.5.0 (2005-06-07): New load screen added.
- Patch 1.3.0 (2005-03-07): Capped at ten players.
External links
| |||||
Template:Instancefooter