m (→External links: External link fix) |
(added link to cutscene) |
||
| Line 1: | Line 1: | ||
| + | {{Warcraft III}} |
||
| − | <onlyinclude>{{{{{tpl|tooltip}}} |
||
| + | {{battle |
||
| − | |mode={{{mode|}}} |
||
| + | |image=WC3-O02.jpg |
||
| − | |arg={{{arg|}}} |
||
| + | |name=The Long March |
||
| − | |disambigpage=Dread Relic (The Dread Relic) |
||
| + | |prev=[[Landfall]] |
||
| − | |quality=Common |
||
| + | |next=<br /> |
||
| − | |icon=INV_Misc_Statue_04 |
||
| + | :[[The Wreckage of Lordaeron]] |
||
| − | |qitem=Yes |
||
| + | [[Cry of the Warsong]] |
||
| − | |itemid=31697 |
||
| + | |conflict=[[Third War]] |
||
| − | |flavor=This mysterious artifact pulses with barely contained power. |
||
| + | |campaign=[[The Invasion of Kalimdor]] |
||
| − | |ilvl=1 |
||
| + | |place=[[The Barrens]] |
||
| − | |name=Dread Relic}}</onlyinclude> |
||
| + | |result=Orcish Horde Victory |
||
| + | |side1=[[Orcish Horde]] |
||
| + | **[[Darkspear Tribe]] |
||
| + | **[[Bloodhoof Tribe]] |
||
| + | **[[Warsong Clan]] |
||
| + | **Other orc [[clan]]s |
||
| + | |side2=*[[Centaur Marauders]] |
||
| + | |commanders1=*[[Thrall]] |
||
| + | *[[Cairne Bloodhoof]] |
||
| + | |commanders2=*Unknown [[Centaur Khan]] |
||
| + | |forces1=*1 [[Far Seer]] |
||
| + | *1 [[Tauren Chieftain]] |
||
| + | *[[Kodo Beast]]s (rideless) |
||
| + | *[[Grunt]]s |
||
| + | *[[Troll Headhunter]]s |
||
| + | *[[Raider (Warcraft III)|Raiders]][[#Three Oases|*]] |
||
| + | *[[Tauren]]s |
||
| + | *[[Catapult]]s |
||
| + | |forces2=*1 [[Centaur Khan]]s |
||
| + | *[[Centaur Archer]]s |
||
| + | *[[Centaur Drudge]]s |
||
| + | *[[Centaur Impaler]]s |
||
| + | *[[Centaur Outrunner]]s |
||
| + | *[[Centaur Sorcerer]]s |
||
| + | |casual1= |
||
| + | |casual2= |
||
| + | }} |
||
| + | '''The Long March''' is chapter 2 of the Orc campaign, [[The Invasion of Kalimdor]]. |
||
| − | ==Source== |
||
| − | This item is contained in the [[Massive Treasure Chest]] located in [[Terokkar Forest]]. {{coords|43|76|Terokkar Forest}} |
||
| + | ==Creeps== |
||
| − | ==Dread Relic as a quest objective== |
||
| + | *5 [[Harpy Scout]]s |
||
| − | This item is an objective of {{questlong|neutral|66|The Dread Relic|id=10877}}. |
||
| + | *1 [[Harpy Rogue]] |
||
| + | *1 [[Harpy Storm-hag]] |
||
| + | *1 [[Harpy Queen]] |
||
| + | *3 [[Lightining Lizard]]s |
||
| + | *2 [[Murloc Nightcrawler]]s |
||
| + | *6 [[Murloc Tiderunner]]s |
||
| + | *1 [[Thunder Lizard]] |
||
| − | == |
+ | ==Critters== |
| + | *5 [[Pig]]s |
||
| − | <!-- Read http://www.wowpedia.org/Wowpedia:External_links before posting your links here. |
||
| − | Links that do not conform to the rules will be DELETED. |
||
| − | Repeat violations may result in a BAN. |
||
| − | Have a nice day. :) --> |
||
| − | {{elinks-item|31697}} |
||
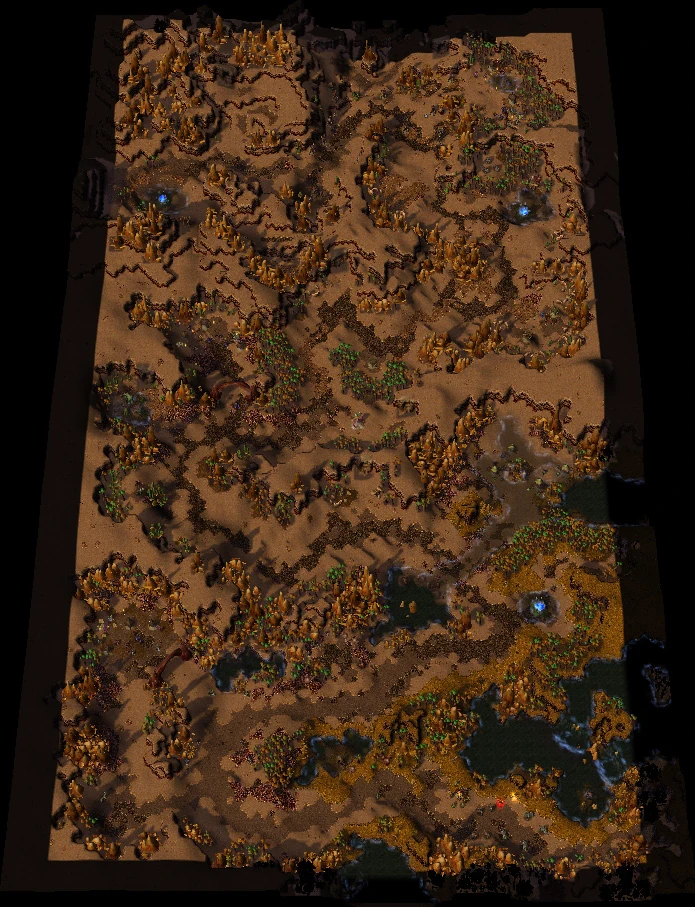
| + | [[File:The Long March Map.jpg|thumb]] |
||
| ⚫ | |||
| + | |||
| + | == <span style="color:#ffff99;">'''Chapter Two'''</span> == |
||
| + | |||
| + | <span style="color:#ffff99;">'''The Long March'''</span> |
||
| + | |||
| + | ''Two days later, upon the desolate plains of the Barrens...'' |
||
| + | |||
| + | == Quests == |
||
| + | === Main Quests === |
||
| + | ====[[Image:Quest Avail 16x16.png|20px]] Three Oases ==== |
||
| + | * The player starts with this quest |
||
| + | * '''Objectives''' |
||
| + | ** Lead the caravan to the first oasis |
||
| + | ** Lead the caravan to the second oasis |
||
| + | ** Lead the caravan to the third oasis |
||
| + | ** Thrall, Cairne and the caravan must survive |
||
| + | * '''Description''' |
||
| + | ** There are three oases along the caravan's route. Clear a path to them so that the burdened Kodos can stop and rest briefly before continuing their journey. |
||
| + | |||
| + | ====[[Image:Quest Avail 16x16.png|20px]] The Caravan ==== |
||
| + | * The player receives this quest after the caravan is attacked |
||
| + | * '''Objectives''' |
||
| + | ** Protect the caravan |
||
| + | ** At least 2 Kodo Beasts must survive |
||
| + | ** Cairne must survive |
||
| + | * '''Description''' |
||
| + | ** You must protect the Tauren caravan from attack by the merciless Centaur herds. |
||
| + | |||
| + | == Quotes == |
||
| + | === Prelude === |
||
| + | * {{RaceIconExt|Thrall|Small}} [[Thrall]] - This land is rugged and beautiful, much like the place from which my people originally come. |
||
| + | * {{RaceIconExt|Cairne|Small}} [[Cairne Bloodhoof]] - Yes. We tauren have always held a great respect for the works of the Earth Mother. There are far worse fates than living freely upon the open plains, young warchief. |
||
| + | * {{RaceIconExt|Thrall|Small}} [[Thrall]] - Perhaps. But my people deserve a land to call their own, Cairne. |
||
| + | * {{RaceIcon|Orc|Male|Small}} [[Grunt]] - Warchief, we've spotted a herd of marauders bearing down on us! |
||
| + | * {{RaceIconExt|Thrall|Small}} [[Thrall]] - Cairne, the kodos are overburdened and must rest. Why don't you remain here and protect the caravan while we search for a suitable oasis? |
||
| + | * {{RaceIconExt|Cairne|Small}} [[Cairne Bloodhoof]] - Ha! There's no need to coddle me, boy. I may be old, but I'm not helpless. |
||
| + | |||
| + | === During game === |
||
| + | * {{RaceIconExt|Thrall|Small}} [[Thrall]] - Assume defensive positions! Lok-Tar Ogar! Let none stand in our way! |
||
| + | ---- |
||
| + | * {{RaceIconExt|Cairne|Small}} [[Cairne Bloodhoof]] - Hold your formations! The kodos must be protected! |
||
| + | ---- |
||
| + | * {{RaceIconExt|Cairne|Small}} [[Cairne Bloodhoof]] - They shall not catch the tauren unprepared! |
||
| + | ---- |
||
| + | * {{RaceIconExt|Cairne|Small}} [[Cairne Bloodhoof]] - The centaur have returned! We're under attack! |
||
| + | ---- |
||
| + | * {{RaceIconExt|Thrall|Small}} [[Thrall]] - Throm-Ka, warrior. You're from the Warsong, are you not? |
||
| + | * {{RaceIcon|Orc|Male|Small}} [[Grunt]] - Yes, Warchief. Hellscream sent our party to find you, but we were separated when the horse men attacked. |
||
| + | * {{RaceIconExt|Thrall|Small}} [[Thrall]] - Don't worry, We'll find them. For now, drink from the pool. The spirits of this place will replenish your strength. |
||
| + | ---- |
||
| + | * {{RaceIconExt|Cairne|Small}} [[Cairne Bloodhoof]] - The marauders attack again! Stand and fight, my brethren! |
||
| + | ---- |
||
| + | * {{RaceIcon|Orc|Male|Small}} [[Raider]] - Hail, Warchief! How may we serve you? |
||
| + | ---- |
||
| + | * [[Image:IconSmall Harpy.gif|16px]] [[Harpy|Harpy Queen]] - Come, sisters! It's been too long since we feasted on outlander flesh! |
||
| + | * {{RaceIconExt|Thrall|Small}} [[Thrall]] - I wouldn't advise it, ladies. Once my wolf riders bring you to the ground, you'll have little chance against us! |
||
| + | ---- |
||
| + | * {{RaceIconExt|Thrall|Small}} [[Thrall]] - The oasis at last! |
||
| + | ---- |
||
| + | * {{RaceIconExt|Thrall|Small}} [[Thrall]] - Warsong catapults! Those could be useful. |
||
| + | ---- |
||
| + | * {{RaceIconExt|Cairne|Small}} [[Cairne Bloodhoof]] - This pass leads straight to Mulgore, but I fear the caravan will be overrun before it reaches the other side. |
||
| + | |||
| + | === Epilogue === |
||
| + | * {{RaceIconExt|Thrall|Small}} [[Thrall]] - Cairne! The caravan will never make it in time! |
||
| + | * {{RaceIconExt|Cairne|Small}} [[Cairne Bloodhoof]] - Let the fury of the Earth Mother deal with these wretches as they deserve! |
||
| + | * {{RaceIconExt|Cairne|Small}} [[Cairne Bloodhoof]] - They will trouble us no more. And you, young warchief, are free to continue your quest. |
||
| + | * {{RaceIconExt|Thrall|Small}} [[Thrall]] - To the Oracle. What is it? |
||
| + | * {{RaceIconExt|Cairne|Small}} [[Cairne Bloodhoof]] - Legends say that it saw the strands of fate as they were woven by the Earth Mother. It alone can show you your destiny. |
||
| + | * {{RaceIconExt|Thrall|Small}} [[Thrall]] - Where will I find it? |
||
| + | * {{RaceIconExt|Cairne|Small}} [[Cairne Bloodhoof]] - Far to the north, near the shadowy base of Mount Hyjal, lies Stonetalon Peak. You will find the Oracle within the peak's hollow, I will send my finest kodos to aid you in your journey. |
||
| + | * {{RaceIconExt|Thrall|Small}} [[Thrall]] - Thank you, Cairne. I will not forget you. |
||
| + | * {{RaceIconExt|Cairne|Small}} [[Cairne Bloodhoof]] - Go with honor, young warchief. May the Earth Mother smile upon you. |
||
| + | |||
| + | == Strategy == |
||
| + | Throughout the mission, waves of centaur will assault the caravan from the front and the back, sometimes simultaneously, sometimes separately. As the caravan progresses closer to the final oasis, the composition of attack waves and their point of origin changes (the game difficulty also affects this). In order to progress the caravan, it must not be under attack, and Thrall must be sufficiently far ahead of the caravan along the main path. If you are quite a ways away from the caravan and it is not moving, it is likely because Thrall is off on a side path rather than the main route. Although there are numerous points along the main path at which the attack waves are modified, there are two points that are most notable. |
||
| + | === Shortly after the first oasis === |
||
| + | There is a region starting shortly after reaching the first oasis where periodic attacks will cease altogether. This region's starting point is along the dark road leading northwest from the oasis, and its end point is along the dark road leading west past the cave along the northern wall (if you cross a large pointy rock along the cliff above the walkable path you are crossing beyond the edge of this region). An easier way to tell if you're in this area is to wait until you cross the shallow water just past the first oasis and stop by the time you reach the cave. As long as the caravan does not move from this area, new attack waves will not spawn. You may still be attacked by attack waves that spawned while you were approaching the region and have not yet reached the caravan, but once defeated they will not replace themselves until the caravan moves forward. |
||
| + | |||
| + | When the caravan reaches this spot, you can take advantage of it by backtracking and exploring any area off to the side of the main path before the first oasis that you had skipped along your journey without fear of leaving the caravan undefended. You can also use the opportunity to heal your units at the oasis in case they did not have time to finish before the caravan moved off, or they were wounded at any point after reaching the oasis. This is also a good opportunity to use any Healing Wards; since the caravan will remain stationary and unprovoked here, they will receive the greatest benefit from their healing aura. |
||
| + | Alternatively, you can take advantage of the fact that the caravan will only follow Thrall, and leave him behind while sending your other units ahead to clear out the main road and side paths. Note that they will be unable to collect any items from this venture until Thrall follows them to pick them up himself, and Thrall will gain no experience from kills that take place too far away from him (although he is likely level-capped by this point anyway). You will still earn gold bounty from creeps slain with this method. Once you have finished exploring to your satisfaction, return all your units to the oasis to re-heal them once last time before moving Thrall and the caravan ahead out of the "safe-zone" and triggering the periodic attacks to resume. |
||
| + | |||
| + | === Shortly after the goblin merchant === |
||
| + | The second region of note makes its start as you leave the dark-brown-colored dirt heading north past the goblin merchant and step foot upon the not-so-dark-brown-colored dirt with the cracked ground. Once the caravan reaches this point (roughly halfway into the mission), attack waves from the front will stop spawning. As before, any previously spawned waves will continue along their merry way until they are dealt with, but they will not be replaced. Attacks continue to spawn from the rear, but the way ahead is threatened only by pre-placed units which can be scouted in advance with ease (raiders and Thrall's Far Sight are good for this). This behavior persists for the remainder of the mission, though the composition and frequency of rear attacks will continue to change as the caravan advances to its final destination. |
||
| + | |||
| + | What this means for you is that you can station your troops at the rear of the caravan most of the time and move Thrall ahead when you plan to advance the group. If an attack comes while Thrall is attempting to move the caravan, your units are already in position to defend the caravan, and only Thrall needs to run back (which is much easier for him to do without a group of slower-moving grunts in his way). You can also change your method of exploring the side paths by passing them with the caravan first, then backtracking to explore them. By "parking" the caravan outside these side paths, it is much easier to return to it should it be attacked while you are distracted. Unfortunately, Cairne continues to position himself at the front end of the caravan, so even though he is the most durable of the tauren units, he is unlikely to be the one targeted by the centaur. |
||
| + | |||
| + | === Catapults and towers === |
||
| + | When you reach the second oasis you rescue a group of Warsong catapults. These are best used against the centaur towers, but the towers are almost always defended by centaur who will counterattack as soon as you open fire. To account for this, when you reach a tower, move one catapult into position, and station your troops near it. Fire the catapult and immediately pull it back to safety while your troops engage the centaur counterattack. Take care to fight the centaur outside the range of the towers. Also be cautious about leaving your catapults behind the caravan as they will be open to attack from periodic attackers. Once the centaur guarding the tower are dead, bring the catapults back into position and safely destroy the towers from outside their attack range. Although the catapults do meaningful damage to centaur units, they should be reserved for the towers only. The catapult splash damage will harm friendly troops and enemies alike (except when targeting buildings), and if they "help out" against the centaur, they are likely to severely weaken or kill your grunts, or worse, the tauren defending the caravan. |
||
| ⚫ | |||
Revision as of 22:25, 28 January 2011
Template:Battle
The Long March is chapter 2 of the Orc campaign, The Invasion of Kalimdor.
Creeps
- 5 Harpy Scouts
- 1 Harpy Rogue
- 1 Harpy Storm-hag
- 1 Harpy Queen
- 3 Lightining Lizards
- 2 Murloc Nightcrawlers
- 6 Murloc Tiderunners
- 1 Thunder Lizard
Critters
- 5 Pigs
Chapter Two
The Long March
Two days later, upon the desolate plains of the Barrens...
Quests
Main Quests
File:Quest Avail 16x16.png Three Oases
- The player starts with this quest
- Objectives
- Lead the caravan to the first oasis
- Lead the caravan to the second oasis
- Lead the caravan to the third oasis
- Thrall, Cairne and the caravan must survive
- Description
- There are three oases along the caravan's route. Clear a path to them so that the burdened Kodos can stop and rest briefly before continuing their journey.
File:Quest Avail 16x16.png The Caravan
- The player receives this quest after the caravan is attacked
- Objectives
- Protect the caravan
- At least 2 Kodo Beasts must survive
- Cairne must survive
- Description
- You must protect the Tauren caravan from attack by the merciless Centaur herds.
Quotes
Prelude
- File:IconSmall Thrall Small.gif Thrall - This land is rugged and beautiful, much like the place from which my people originally come.
- File:IconSmall Cairne Small.gif Cairne Bloodhoof - Yes. We tauren have always held a great respect for the works of the Earth Mother. There are far worse fates than living freely upon the open plains, young warchief.
- File:IconSmall Thrall Small.gif Thrall - Perhaps. But my people deserve a land to call their own, Cairne.
 Grunt - Warchief, we've spotted a herd of marauders bearing down on us!
- File:IconSmall Thrall Small.gif Thrall - Cairne, the kodos are overburdened and must rest. Why don't you remain here and protect the caravan while we search for a suitable oasis?
- File:IconSmall Cairne Small.gif Cairne Bloodhoof - Ha! There's no need to coddle me, boy. I may be old, but I'm not helpless.
During game
- File:IconSmall Thrall Small.gif Thrall - Assume defensive positions! Lok-Tar Ogar! Let none stand in our way!
- File:IconSmall Cairne Small.gif Cairne Bloodhoof - Hold your formations! The kodos must be protected!
- File:IconSmall Cairne Small.gif Cairne Bloodhoof - They shall not catch the tauren unprepared!
- File:IconSmall Cairne Small.gif Cairne Bloodhoof - The centaur have returned! We're under attack!
- File:IconSmall Thrall Small.gif Thrall - Throm-Ka, warrior. You're from the Warsong, are you not?
 Grunt - Yes, Warchief. Hellscream sent our party to find you, but we were separated when the horse men attacked.
- File:IconSmall Thrall Small.gif Thrall - Don't worry, We'll find them. For now, drink from the pool. The spirits of this place will replenish your strength.
- File:IconSmall Cairne Small.gif Cairne Bloodhoof - The marauders attack again! Stand and fight, my brethren!
- Raider - Hail, Warchief! How may we serve you?
- Harpy Queen - Come, sisters! It's been too long since we feasted on outlander flesh!
- File:IconSmall Thrall Small.gif Thrall - I wouldn't advise it, ladies. Once my wolf riders bring you to the ground, you'll have little chance against us!
- File:IconSmall Thrall Small.gif Thrall - The oasis at last!
- File:IconSmall Thrall Small.gif Thrall - Warsong catapults! Those could be useful.
- File:IconSmall Cairne Small.gif Cairne Bloodhoof - This pass leads straight to Mulgore, but I fear the caravan will be overrun before it reaches the other side.
Epilogue
- File:IconSmall Thrall Small.gif Thrall - Cairne! The caravan will never make it in time!
- File:IconSmall Cairne Small.gif Cairne Bloodhoof - Let the fury of the Earth Mother deal with these wretches as they deserve!
- File:IconSmall Cairne Small.gif Cairne Bloodhoof - They will trouble us no more. And you, young warchief, are free to continue your quest.
- File:IconSmall Thrall Small.gif Thrall - To the Oracle. What is it?
- File:IconSmall Cairne Small.gif Cairne Bloodhoof - Legends say that it saw the strands of fate as they were woven by the Earth Mother. It alone can show you your destiny.
- File:IconSmall Thrall Small.gif Thrall - Where will I find it?
- File:IconSmall Cairne Small.gif Cairne Bloodhoof - Far to the north, near the shadowy base of Mount Hyjal, lies Stonetalon Peak. You will find the Oracle within the peak's hollow, I will send my finest kodos to aid you in your journey.
- File:IconSmall Thrall Small.gif Thrall - Thank you, Cairne. I will not forget you.
- File:IconSmall Cairne Small.gif Cairne Bloodhoof - Go with honor, young warchief. May the Earth Mother smile upon you.
Strategy
Throughout the mission, waves of centaur will assault the caravan from the front and the back, sometimes simultaneously, sometimes separately. As the caravan progresses closer to the final oasis, the composition of attack waves and their point of origin changes (the game difficulty also affects this). In order to progress the caravan, it must not be under attack, and Thrall must be sufficiently far ahead of the caravan along the main path. If you are quite a ways away from the caravan and it is not moving, it is likely because Thrall is off on a side path rather than the main route. Although there are numerous points along the main path at which the attack waves are modified, there are two points that are most notable.
Shortly after the first oasis
There is a region starting shortly after reaching the first oasis where periodic attacks will cease altogether. This region's starting point is along the dark road leading northwest from the oasis, and its end point is along the dark road leading west past the cave along the northern wall (if you cross a large pointy rock along the cliff above the walkable path you are crossing beyond the edge of this region). An easier way to tell if you're in this area is to wait until you cross the shallow water just past the first oasis and stop by the time you reach the cave. As long as the caravan does not move from this area, new attack waves will not spawn. You may still be attacked by attack waves that spawned while you were approaching the region and have not yet reached the caravan, but once defeated they will not replace themselves until the caravan moves forward.
When the caravan reaches this spot, you can take advantage of it by backtracking and exploring any area off to the side of the main path before the first oasis that you had skipped along your journey without fear of leaving the caravan undefended. You can also use the opportunity to heal your units at the oasis in case they did not have time to finish before the caravan moved off, or they were wounded at any point after reaching the oasis. This is also a good opportunity to use any Healing Wards; since the caravan will remain stationary and unprovoked here, they will receive the greatest benefit from their healing aura. Alternatively, you can take advantage of the fact that the caravan will only follow Thrall, and leave him behind while sending your other units ahead to clear out the main road and side paths. Note that they will be unable to collect any items from this venture until Thrall follows them to pick them up himself, and Thrall will gain no experience from kills that take place too far away from him (although he is likely level-capped by this point anyway). You will still earn gold bounty from creeps slain with this method. Once you have finished exploring to your satisfaction, return all your units to the oasis to re-heal them once last time before moving Thrall and the caravan ahead out of the "safe-zone" and triggering the periodic attacks to resume.
Shortly after the goblin merchant
The second region of note makes its start as you leave the dark-brown-colored dirt heading north past the goblin merchant and step foot upon the not-so-dark-brown-colored dirt with the cracked ground. Once the caravan reaches this point (roughly halfway into the mission), attack waves from the front will stop spawning. As before, any previously spawned waves will continue along their merry way until they are dealt with, but they will not be replaced. Attacks continue to spawn from the rear, but the way ahead is threatened only by pre-placed units which can be scouted in advance with ease (raiders and Thrall's Far Sight are good for this). This behavior persists for the remainder of the mission, though the composition and frequency of rear attacks will continue to change as the caravan advances to its final destination.
What this means for you is that you can station your troops at the rear of the caravan most of the time and move Thrall ahead when you plan to advance the group. If an attack comes while Thrall is attempting to move the caravan, your units are already in position to defend the caravan, and only Thrall needs to run back (which is much easier for him to do without a group of slower-moving grunts in his way). You can also change your method of exploring the side paths by passing them with the caravan first, then backtracking to explore them. By "parking" the caravan outside these side paths, it is much easier to return to it should it be attacked while you are distracted. Unfortunately, Cairne continues to position himself at the front end of the caravan, so even though he is the most durable of the tauren units, he is unlikely to be the one targeted by the centaur.
Catapults and towers
When you reach the second oasis you rescue a group of Warsong catapults. These are best used against the centaur towers, but the towers are almost always defended by centaur who will counterattack as soon as you open fire. To account for this, when you reach a tower, move one catapult into position, and station your troops near it. Fire the catapult and immediately pull it back to safety while your troops engage the centaur counterattack. Take care to fight the centaur outside the range of the towers. Also be cautious about leaving your catapults behind the caravan as they will be open to attack from periodic attackers. Once the centaur guarding the tower are dead, bring the catapults back into position and safely destroy the towers from outside their attack range. Although the catapults do meaningful damage to centaur units, they should be reserved for the towers only. The catapult splash damage will harm friendly troops and enemies alike (except when targeting buildings), and if they "help out" against the centaur, they are likely to severely weaken or kill your grunts, or worse, the tauren defending the caravan.