No edit summary |
WrathOfDeathfrost@legacy41588387 (talk | contribs) No edit summary |
||
| Line 1: | Line 1: | ||
| + | {{npcbox |
||
| − | [[image:Terenthis.jpg|right]] |
||
| + | |name=Ambassador Hellmaw |
||
| − | [[Terenthis]] is a level 15 [[quest giver]] located in [[Auberdine]] in the [[night elven]] zone of [[Darkshore]]. |
||
| + | |image=Ambassador_Hellmaw.jpg |
||
| + | |level=72 |
||
| + | |type=Elite |
||
| + | |race=Fiend |
||
| + | |creature=Demon |
||
| + | |location=[[Shadow Labyrinth]], [[Auchindoun]] |
||
| + | |faction=Combat |
||
| + | |status=Killable |
||
| + | |health=130,000 |
||
| + | |money={{cost||65|59}} |
||
| + | |instance=Shadow Labyrinth |
||
| + | }} |
||
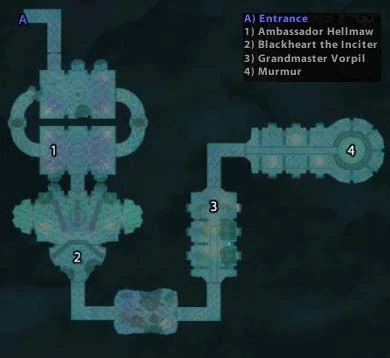
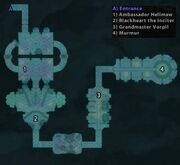
| + | [[Image:Shadow Labyrinth Map.jpg|thumb|Ambassador Hellmaw is located at map location 1.]] |
||
| − | He starts the following quests: |
||
| + | '''Ambassador Hellmaw''' is the first [[boss]] of [[Shadow Labyrinth]] in [[Auchindoun]]. The [[Cabal]] feeds prisoners, which they don't need anymore, to him. |
||
| − | * [[Image:Alliance_15.gif]] [10] [[Quest:The Hunter's Path|The Hunter's Path]] (Hunter) |
||
| − | * [[Image:Alliance_15.gif]] [14] [[Quest:How Big a Threat?|How Big a Threat?]] |
||
| − | * [[Image:Alliance_15.gif]] [14] [[Quest:How Big a Threat?|How Big a Threat?]] |
||
| − | * [[Image:Alliance_15.gif]] [15] [[Quest:Thundris Windweaver|Thundris Windweaver]] |
||
| − | * [[Image:Alliance_15.gif]] [20] [[Quest:A Lost Master|A Lost Master]] |
||
| − | * [[Image:Alliance_15.gif]] [20] [[Quest:A Lost Master|A Lost Master]] |
||
| − | <br> |
||
| − | See [[List of Darkshore NPCs]]. |
||
| + | == Attacks and abilities == |
||
| ⚫ | |||
| + | * AoE fear (25 second cooldown, 40 yard radius, dispellable) |
||
| ⚫ | |||
| + | * '''Corrosive Acid''': Frontal cone acid spray, lowers armor and does high nature damage over time. (Not dispellable, need heals to keep it up, mages/rogues/pally can iceblock/cloak of shadow/bubble). |
||
| − | [[Category:NPCs]] |
||
| + | |||
| ⚫ | |||
| + | ===Heroic=== |
||
| − | [[Category:Zone:Darkshore]] |
||
| + | * Normal attack: 2500 on plate |
||
| + | * Corrosive Acid: 1200 per tick |
||
| + | |||
| + | == Strategy == |
||
| + | After killing the last of the ritualists Hellmaw will path one time around the room. He will stop where he initially was standing before the last mob was killed, then patrol up and down the northern most hallway indefinitely. It is best to pull the final ritualist far back to the southern entrance into the room. This will give you all the time you need to prepare for the final boss fight. |
||
| + | |||
| + | First, have the [[Main Tank]] face him away from the party to minimize the effect of his corrosive acid. He fears fairly often, if the tank gets feared he may lose aggro, or the boss will follow him and hit other players with acid. A priest using [[Fear Ward]] can prevent this, a shaman can drop [[Tremor Totem]], otherwise the fear effect can be dispelled. Have someone keep track of time, so when there's 5 seconds left on the 25-second timer the healers can cast a couple of HoTs on the tank and move out of range, then get back and dispel if he is affected by fear. |
||
| + | |||
| + | A warrior using Spell Reflection can also avoid the fear - it won't affect the boss, but the warrior won't be either. Warriors can also "stance dance", use berserker stance to avoid fear, paladins can bubble out. Another method is using a warlock's felhunter with devour magic. |
||
| + | |||
| + | You can also tank him in the tunnel leading to the room, so healers will not be feared out of the line of sight of the tank. |
||
| + | |||
| + | Note that since [[patch 2.3]], mobs will often continue to attack feared tanks, making this encounters easier. |
||
| + | |||
| + | === Heroic === |
||
| + | This fight is all-over pretty easy even for inexperienced end-game players. The game goes just like before, though 2 healers might be a very good idea for this fight depending on your mana pool. After a few wipes we realized that Hellmaw in heroic mode was actually a timed encounter. An enrage ability activates if you don't kill the boss in maximum 3 minutes, pretty much like Mechano-Lord Capacitus in Mechanar Heroic Mode and one-shots every one by dealing over 30k damage on leather/cloth, 20k on mail and over 10-15k on plate. Heavy DPS is required in order not to wipe against this fairly easy boss. It is suggested to use all dump aggro abilities you might have like Soulshatter for warlocks or Invisibility for mages to keep steady DPS on him. Pulling aggro would result in possible death or losing precious seconds of DPS. Remember that resisting Hellmaw's fear might cause that person to die, it is suggested not to use any Shadow Resistance aura or Protection buff for this encounter. |
||
| + | |||
| + | If you have a Shaman with you, use [[Tremor Totem]]s and Bloodlust to ensure you have enough DPS to down him. If your group consists of casters, make sure they've got sufficient mana pots. |
||
| + | |||
| + | == Loot == |
||
| + | {{Lootbox|Normal and Heroic drops |
||
| + | |Dream-Wing Helm |
||
| + | |Idol of the Emerald Queen |
||
| + | |Jaedenfire Gloves of Annihilation |
||
| + | |Ornate Boots of the Sanctified |
||
| + | |Platinum Shield of the Valorous |
||
| + | |Soul-Wand of the Aldor |
||
| + | |Spirit Shard}} |
||
| + | |||
| + | |||
| + | {{Lootbox|Heroic-only drops |
||
| + | |Etched Fire Opal |
||
| + | |Regal Chrysoprase |
||
| + | |Rune Covered Chrysoprase}} |
||
| + | |||
| + | == Quotes == |
||
| + | '''Intro:''' |
||
| + | *Infidels have invaded the sanctuary! Sniveling pests... You have yet to learn the true meaning of agony! |
||
| + | '''Aggro:''' |
||
| + | *Pathetic mortals! You will pay dearly! |
||
| + | *I will break you! |
||
| + | *Finally, something to relieve the tedium. |
||
| + | '''Killing a player:''' |
||
| + | *Do you fear death? <insidious laughter> |
||
| + | *This is the part I enjoy most... |
||
| + | '''Calling for help:''' |
||
| + | *Aid me, you fools, before it's too late! |
||
| + | '''Death:''' |
||
| + | *Do not...grow...overconfident, mortal. |
||
| + | |||
| + | ==External links== |
||
| + | <!-- Read http://www.wowpedia.org/Wowpedia:External_links before posting your links here. |
||
| + | Links that do not conform to the rules will be DELETED. |
||
| + | Repeat violations may result in a BAN. |
||
| + | Have a nice day. :) --> |
||
| + | {{elinks-NPC|18731|armory=1}} |
||
| + | |||
| + | {{DEFAULTSORT:Hellmaw, Ambassador}} |
||
| + | |||
| + | [[fr:Ambassadeur Gueule-d'Enfer]] |
||
| ⚫ | |||
| ⚫ | |||
| ⚫ | |||
Revision as of 17:07, 3 February 2011
 | |||||||
| Race | Fiend (Demon) | ||||||
| Level | 72 Elite | ||||||
| Location | Shadow Labyrinth, Auchindoun | ||||||
| Status | Killable | ||||||
| |||||||
Ambassador Hellmaw is located at map location 1.
Ambassador Hellmaw is the first boss of Shadow Labyrinth in Auchindoun. The Cabal feeds prisoners, which they don't need anymore, to him.
Attacks and abilities
- AoE fear (25 second cooldown, 40 yard radius, dispellable)
- Corrosive Acid: Frontal cone acid spray, lowers armor and does high nature damage over time. (Not dispellable, need heals to keep it up, mages/rogues/pally can iceblock/cloak of shadow/bubble).
Heroic
- Normal attack: 2500 on plate
- Corrosive Acid: 1200 per tick
Strategy
After killing the last of the ritualists Hellmaw will path one time around the room. He will stop where he initially was standing before the last mob was killed, then patrol up and down the northern most hallway indefinitely. It is best to pull the final ritualist far back to the southern entrance into the room. This will give you all the time you need to prepare for the final boss fight.
First, have the Main Tank face him away from the party to minimize the effect of his corrosive acid. He fears fairly often, if the tank gets feared he may lose aggro, or the boss will follow him and hit other players with acid. A priest using ![]() [Fear Ward] can prevent this, a shaman can drop
[Fear Ward] can prevent this, a shaman can drop ![]() [Tremor Totem], otherwise the fear effect can be dispelled. Have someone keep track of time, so when there's 5 seconds left on the 25-second timer the healers can cast a couple of HoTs on the tank and move out of range, then get back and dispel if he is affected by fear.
[Tremor Totem], otherwise the fear effect can be dispelled. Have someone keep track of time, so when there's 5 seconds left on the 25-second timer the healers can cast a couple of HoTs on the tank and move out of range, then get back and dispel if he is affected by fear.
A warrior using Spell Reflection can also avoid the fear - it won't affect the boss, but the warrior won't be either. Warriors can also "stance dance", use berserker stance to avoid fear, paladins can bubble out. Another method is using a warlock's felhunter with devour magic.
You can also tank him in the tunnel leading to the room, so healers will not be feared out of the line of sight of the tank.
Note that since patch 2.3, mobs will often continue to attack feared tanks, making this encounters easier.
Heroic
This fight is all-over pretty easy even for inexperienced end-game players. The game goes just like before, though 2 healers might be a very good idea for this fight depending on your mana pool. After a few wipes we realized that Hellmaw in heroic mode was actually a timed encounter. An enrage ability activates if you don't kill the boss in maximum 3 minutes, pretty much like Mechano-Lord Capacitus in Mechanar Heroic Mode and one-shots every one by dealing over 30k damage on leather/cloth, 20k on mail and over 10-15k on plate. Heavy DPS is required in order not to wipe against this fairly easy boss. It is suggested to use all dump aggro abilities you might have like Soulshatter for warlocks or Invisibility for mages to keep steady DPS on him. Pulling aggro would result in possible death or losing precious seconds of DPS. Remember that resisting Hellmaw's fear might cause that person to die, it is suggested not to use any Shadow Resistance aura or Protection buff for this encounter.
If you have a Shaman with you, use Tremor Totems and Bloodlust to ensure you have enough DPS to down him. If your group consists of casters, make sure they've got sufficient mana pots.
Loot
|
Quotes
Intro:
- Infidels have invaded the sanctuary! Sniveling pests... You have yet to learn the true meaning of agony!
Aggro:
- Pathetic mortals! You will pay dearly!
- I will break you!
- Finally, something to relieve the tedium.
Killing a player:
- Do you fear death? <insidious laughter>
- This is the part I enjoy most...
Calling for help:
- Aid me, you fools, before it's too late!
Death:
- Do not...grow...overconfident, mortal.